Lenovo ThinkPad 770X TP 770X User's Reference that shipped with the system - Page 43
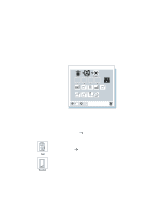
Display Device, View Angle, Default, Status, Device, Click on the button of your choice
 |
View all Lenovo ThinkPad 770X manuals
Add to My Manuals
Save this manual to your list of manuals |
Page 43 highlights
Functions of Your Computer 3 The Display Device buttons. Click on one of these buttons to set the display output type to the LCD, external monitor (CRT), or both. When making a presentation, you can click on the presentation button to disable any system timers, such as the LCD turnoff timer or the power management mode timers. 4 The Help button displays online help. 5 The Exit button. Click on this button to save the changes made and to exit from the ThinkPad Configuration window. 6 The View Angle buttons. Click on the front view or rear view button to display the hardware feature locations. 7 The Default button. Click on this button to set the default values for each option and to cancel the changes you just made. 8 The Status bar. The device name and its status appears in the status bar when you place the cursor on a device button. 9 The Device buttons. Click on the button of your choice from the window; then set the options for that device from the window that appears. If the device is enabled, the red indicator next to the button is lit. Otherwise, it stays off. Only the top portion of the window is displayed when you click on the triangular minimize button in the top-right corner. Chapter 1. Getting Familiar with Your Computer 29
-
 1
1 -
2
-
3
-
4
-
5
-
6
-
7
-
8
-
9
-
10
-
11
-
12
-
13
-
14
-
15
-
16
-
17
-
18
-
19
-
20
-
21
-
22
-
23
-
24
-
25
-
26
-
27
-
28
-
29
-
30
-
31
-
32
-
33
-
34
-
35
-
36
-
37
-
 38
38 -
 39
39 -
 40
40 -
 41
41 -
 42
42 -
 43
43 -
 44
44 -
 45
45 -
 46
46 -
 47
47 -
 48
48 -
49
-
50
-
51
-
52
-
53
-
54
-
55
-
56
-
57
-
58
-
59
-
60
-
61
-
62
-
63
-
64
-
65
-
66
-
67
-
68
-
69
-
70
-
71
-
72
-
73
-
74
-
75
-
76
-
77
-
78
-
79
-
80
-
81
-
82
-
83
-
84
-
85
-
86
-
87
-
88
-
89
-
90
-
91
-
92
-
93
-
94
-
95
-
96
-
97
-
98
-
99
-
100
-
101
-
102
-
103
-
104
-
105
-
106
-
107
-
108
-
109
-
110
-
111
-
112
-
113
-
114
-
115
-
116
-
117
-
118
-
119
-
120
-
121
-
122
-
123
-
124
-
125
-
126
-
127
-
128
-
129
-
130
-
131
-
132
-
133
-
134
-
135
-
136
-
137
-
138
-
139
-
140
-
141
-
142
-
143
-
144
-
145
-
146
-
147
-
148
-
149
-
150
-
151
-
152
-
153
-
154
-
155
-
156
-
157
-
158
-
159
-
160
-
161
-
162
-
163
-
164
-
165
-
166
-
167
-
168
-
169
-
170
-
171
-
172
-
173
-
174
-
175
-
176
-
177
-
178
-
179
-
180
-
181
-
182
-
183
-
184
-
185
-
186
-
187
-
188
-
189
-
190
-
191
-
192
-
193
-
194
-
195
-
196
-
197
-
198
-
199
-
200
-
201
 |
 |