Lenovo ThinkPad A21e Hardware Maintenance Manual for ThinkPad A22m (wireless m - Page 92
Push both of the upper and the lower release buttons, into each slot.
 |
View all Lenovo ThinkPad A21e manuals
Add to My Manuals
Save this manual to your list of manuals |
Page 92 highlights
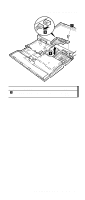
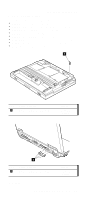
Removing and replacing a FRU When installing: Before installing the new PC card slot assembly, do the following. 1. Pull the release button cover of the upper slot out with your fingers as shown in the figure below. 2. Push both of the upper and the lower release buttons into each slot. 88 ThinkPad A22m wireless models
-
 1
1 -
2
-
3
-
4
-
5
-
6
-
7
-
8
-
9
-
10
-
11
-
12
-
13
-
14
-
15
-
16
-
17
-
18
-
19
-
20
-
21
-
22
-
23
-
24
-
25
-
26
-
27
-
28
-
29
-
30
-
31
-
32
-
33
-
34
-
35
-
36
-
37
-
38
-
39
-
40
-
41
-
42
-
43
-
44
-
45
-
46
-
47
-
48
-
49
-
50
-
51
-
52
-
53
-
54
-
55
-
56
-
57
-
58
-
59
-
60
-
61
-
62
-
63
-
64
-
65
-
66
-
67
-
68
-
69
-
70
-
71
-
72
-
73
-
74
-
75
-
76
-
77
-
78
-
79
-
80
-
81
-
82
-
83
-
84
-
85
-
86
-
 87
87 -
 88
88 -
 89
89 -
 90
90 -
 91
91 -
 92
92 -
 93
93 -
 94
94 -
 95
95 -
 96
96 -
 97
97 -
98
-
99
-
100
-
101
-
102
-
103
-
104
-
105
-
106
-
107
-
108
-
109
-
110
-
111
-
112
-
113
-
114
-
115
-
116
-
117
-
118
-
119
-
120
-
121
-
122
-
123
-
124
-
125
-
126
-
127
-
128
-
129
-
130
-
131
-
132
-
133
-
134
-
135
-
136
-
137
-
138
-
139
-
140
 |
 |

When installing:
Before installing the new PC card slot assembly, do the
following.
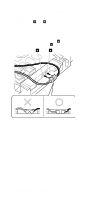
1.
Pull the release button cover of the upper slot out with
your fingers as shown in the figure below.
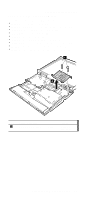
2.
Push both of the upper and the lower release buttons
into each slot.
Removing and replacing a FRU
88
ThinkPad A22m wireless models