Lenovo ThinkPad X121e Safety and Warranty Guide - ThinkPad X121e - Page 65
Power sub card and microphone, 1040 Hard disk drive or solid state drive assembly
 |
View all Lenovo ThinkPad X121e manuals
Add to My Manuals
Save this manual to your list of manuals |
Page 65 highlights
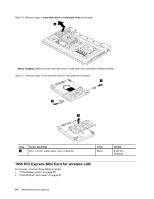
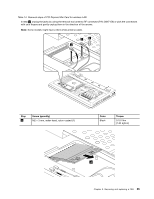
Table 16. Removal steps of keyboard (continued) When installing: Attach the keyboard so that the keyboard edge is under the frame as shown in the following figure. 1080 Power sub card and microphone For access, remove these FRUs in order: • "1010 Battery pack" on page 50 • "1020 Bottom slot cover" on page 51 • "1040 Hard disk drive or solid state drive assembly" on page 53 • "1070 Keyboard" on page 57 Table 17. Removal steps of power sub card 1 Chapter 8. Removing and replacing a FRU 59
-
 1
1 -
2
-
3
-
4
-
5
-
6
-
7
-
8
-
9
-
10
-
11
-
12
-
13
-
14
-
15
-
16
-
17
-
18
-
19
-
20
-
21
-
22
-
23
-
24
-
25
-
26
-
27
-
28
-
29
-
30
-
31
-
32
-
33
-
34
-
35
-
36
-
37
-
38
-
39
-
40
-
41
-
42
-
43
-
44
-
45
-
46
-
47
-
48
-
49
-
50
-
51
-
52
-
53
-
54
-
55
-
56
-
57
-
58
-
59
-
 60
60 -
 61
61 -
 62
62 -
 63
63 -
 64
64 -
 65
65 -
 66
66 -
 67
67 -
 68
68 -
 69
69 -
 70
70 -
71
-
72
-
73
-
74
-
75
-
76
-
77
-
78
-
79
-
80
-
81
-
82
-
83
-
84
-
85
-
86
-
87
-
88
-
89
-
90
-
91
-
92
-
93
-
94
-
95
-
96
-
97
-
98
-
99
-
100
-
101
-
102
-
103
-
104
-
105
-
106
-
107
-
108
-
109
-
110
-
111
-
112
 |
 |
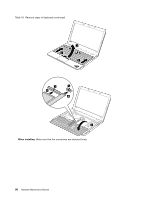
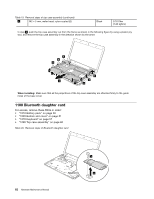
Table 16. Removal steps of keyboard (continued)
When installing:
Attach the keyboard so that the keyboard edge is under the frame as shown in the following figure.
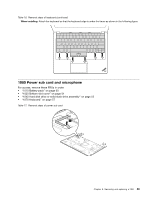
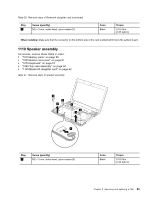
1080 Power sub card and microphone
For access, remove these FRUs in order:
•
“1010 Battery pack” on page 50
•
“1020 Bottom slot cover” on page 51
•
“1040 Hard disk drive or solid state drive assembly” on page 53
•
“1070 Keyboard” on page 57
Table 17. Removal steps of power sub card
1
Chapter 8
.
Removing and replacing a FRU
59