Lenovo Yoga 2 Pro User Guide - Lenovo Yoga 2 Pro
Lenovo Yoga 2 Pro Manual
 |
View all Lenovo Yoga 2 Pro manuals
Add to My Manuals
Save this manual to your list of manuals |
Lenovo Yoga 2 Pro manual content summary:
- Lenovo Yoga 2 Pro | User Guide - Lenovo Yoga 2 Pro - Page 1
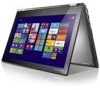
Lenovo Yoga 2 Pro 13 inch Display User Guide Read the safety notices and important tips in the included manuals before using your computer. - Lenovo Yoga 2 Pro | User Guide - Lenovo Yoga 2 Pro - Page 2
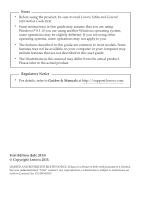
. Regulatory Notice • For details, refer to Guides & Manuals at http://support.lenovo.com. First Edition (July 2013) © Copyright Lenovo 2013. LIMITED AND RESTRICTED RIGHTS NOTICE: If data or software is delivered pursuant to a General Services Administration "GSA" contract, use, reproduction, or - Lenovo Yoga 2 Pro | User Guide - Lenovo Yoga 2 Pro - Page 3
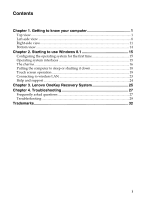
15 The charms ...16 Putting the computer to sleep or shutting it down 18 Touch screen operation 19 Connecting to wireless LAN 23 Help and support ...24 Chapter 3. Lenovo OneKey Recovery System 25 Chapter 4. Troubleshooting 27 Frequently asked questions 27 Troubleshooting ...29 Trademarks 32 i - Lenovo Yoga 2 Pro | User Guide - Lenovo Yoga 2 Pro - Page 4
- Lenovo Yoga 2 Pro | User Guide - Lenovo Yoga 2 Pro - Page 5
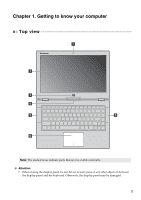
Chapter 1. Getting to know your computer Top view 2 3 4 5 5 6 Note: The dashed areas indicate parts that are not visible externally. Attention: • When closing the display panel, be careful not to leave pens or any other objects in between the display panel and the keyboard. Otherwise, the - Lenovo Yoga 2 Pro | User Guide - Lenovo Yoga 2 Pro - Page 6
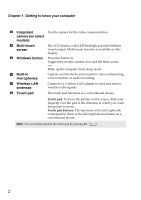
display with LED backlight provides brilliant visual output. Multi-touch function is available on this display. c Windows button Press this button to: Toggle between the current view and the Start screen. -orWake up the computer from sleep mode. d Built-in microphones Capture sound which can be - Lenovo Yoga 2 Pro | User Guide - Lenovo Yoga 2 Pro - Page 7
level. : Closes the currently active window. Refreshes the desktop or : the currently active window. : Enables/disables the touch pad. : Enables/disables Airplane mode. : Displays all currently active apps. Turns on/off the : backlight of the LCD screen. Toggles the display : between the - Lenovo Yoga 2 Pro | User Guide - Lenovo Yoga 2 Pro - Page 8
Chapter 1. Getting to know your computer Function key combinations Through the use of the function keys, you can change operational features instantly. To use this function, press and hold Fn a; then press one of the function keys b. The following describes the features of each function key. Fn + - Lenovo Yoga 2 Pro | User Guide - Lenovo Yoga 2 Pro - Page 9
Chapter 1. Getting to know your computer Positioning the display panel The display panel can be opened to any angle up to 360 degrees. Notebook Mode Suitable for tasks that require a keyboard and mouse (such as creating documents, writing e-mails, and so on). 5 - Lenovo Yoga 2 Pro | User Guide - Lenovo Yoga 2 Pro - Page 10
Chapter 1. Getting to know your computer Stand Mode (Theater Mode) Suitable for tasks that require little or no touch (such as viewing photos or playing videos). Tablet Mode Suitable for tasks that require touching the screen often (such as surfing the Web, playing games, and so on). 6 - Lenovo Yoga 2 Pro | User Guide - Lenovo Yoga 2 Pro - Page 11
Chapter 1. Getting to know your computer Tent Mode (Presentation Mode) Suitable for tasks that require limited interaction with the touch screen (such as displaying graphs or PowerPoint presentations). Attention: • Do not open the display with too much force, otherwise the panel or hinges may be - Lenovo Yoga 2 Pro | User Guide - Lenovo Yoga 2 Pro - Page 12
devices. Note: For details, see "Connecting USB devices" on page 9. c HDMI port Connects to devices with HDMI input such as a TV or an external display. d Memory card slot Insert memory cards (not supplied) here. Note: For details, see "Using memory cards (not supplied)" on page 10. 8 - Lenovo Yoga 2 Pro | User Guide - Lenovo Yoga 2 Pro - Page 13
with USB devices. The first time you plug a USB device into a particular USB port on your computer, Windows automatically installs a driver for that device. After the driver has been installed, you can disconnect and reconnect the device without performing any additional steps. Note: Typically - Lenovo Yoga 2 Pro | User Guide - Lenovo Yoga 2 Pro - Page 14
Bluetooth, etc.). Inserting a memory card Slide the memory card in until it clicks into place. Removing a memory card 1 Push the memory card in until you hear a click. 2 Gently pull the memory card out of the memory card slot. Note: Before removing the memory card, disable it by using the Windows - Lenovo Yoga 2 Pro | User Guide - Lenovo Yoga 2 Pro - Page 15
has between 5% and 20% charge. Fast blinking amber The battery has less than 5% charge. Slow blinking amber The battery is being charged. When battery charge reaches 20%, the blinking color changes to white. Slow blinking white The battery has between 20% and 80% charge and is still charging - Lenovo Yoga 2 Pro | User Guide - Lenovo Yoga 2 Pro - Page 16
Lenovo OneKey Recovery System or the BIOS setup utility, or to enter the boot menu. d Rotation lock button Keeps the screen locked in portrait or landscape orientation. Locking the screen jack does not support conventional microphones. • The recording function may not be supported if third-party - Lenovo Yoga 2 Pro | User Guide - Lenovo Yoga 2 Pro - Page 17
Chapter 1. Getting to know your computer Screen orientation You can rotate the display panel to your preferred orientation. • The orientation of the . It is located on the right edge of the computer (See illustration below). Note: The screen rotation lock button will be disabled in notebook mode - Lenovo Yoga 2 Pro | User Guide - Lenovo Yoga 2 Pro - Page 18
Chapter 1. Getting to know your computer Bottom view 1 2 2 a Ventilation slots Dissipate internal heat. Note: Make sure that the ventilation slots are not blocked or else the computer may overheat. b Speakers Provide audio output. 14 - Lenovo Yoga 2 Pro | User Guide - Lenovo Yoga 2 Pro - Page 19
to the desktop, do one of the following: • Select the desktop tile on the Start screen. • Press the Windows button. • Press Windows key + D. To switch from the desktop to the Start screen, do one of the following: • Select Start from the charms. • Move the pointer to the desktop lower-left corner - Lenovo Yoga 2 Pro | User Guide - Lenovo Yoga 2 Pro - Page 20
lower-right corner until the charms bar is displayed. • Use one finger to swipe in from the right edge of the screen until the charms bar is displayed. • Press Windows key + C. Search charm The Search charm enables you to find whatever you are looking for, including apps, settings and files. Share - Lenovo Yoga 2 Pro | User Guide - Lenovo Yoga 2 Pro - Page 21
Chapter 2. Starting to use Windows 8.1 Devices charm The Devices charm enables you to connect or send files to any external devices, such as digital cameras, TVs, or shutting down the computer. Also, you can get to the Control Panel through the Settings charm when using the desktop screen. 17 - Lenovo Yoga 2 Pro | User Guide - Lenovo Yoga 2 Pro - Page 22
disk drive is spinning can damage the hard disk, causing loss of data. To wake the computer, do one of the following: • Press any key on the keyboard. (Notebook mode only) • Press the Power button. • Press the Windows button. Shutting down the computer If you are not going to use your computer - Lenovo Yoga 2 Pro | User Guide - Lenovo Yoga 2 Pro - Page 23
Chapter 2. Starting to use Windows 8.1 Touch screen operation The display panel can accept inputs like a tablet, using the multi-touch screen, or like a traditional notebook computer, using the keyboard and touch pad. Multi-touch gestures You can touch the screen with one or more fingertips - Lenovo Yoga 2 Pro | User Guide - Lenovo Yoga 2 Pro - Page 24
Starting to use Windows 8.1 (continued) Frequently used gestures Zoom Move two fingers together or apart while touching the screen. Tasks performed can be rotated, depending upon the app.) Slide Drag your finger across the screen. Pans or scrolls through lists and pages. Can also move an object - Lenovo Yoga 2 Pro | User Guide - Lenovo Yoga 2 Pro - Page 25
, you can also: • Swipe from the top edge to halfway down the screen without lifting your finger to dock that app on the left or right side of the screen. This allows you to keep two apps open simultaneously in a split-screen format. • Swipe from the top edge straight down to the bottom edge - Lenovo Yoga 2 Pro | User Guide - Lenovo Yoga 2 Pro - Page 26
Chapter 2. Starting to use Windows 8.1 (continued) Frequently used gestures Tasks performed Swiping in from the left edge finger, push that app quickly back off the left edge of the screen. This displays a list of the apps currently running in the background. Swiping in from the right edge of - Lenovo Yoga 2 Pro | User Guide - Lenovo Yoga 2 Pro - Page 27
Chapter 2. Starting to use Windows 8.1 Connecting to wireless LAN Enabling wireless connection To enable wireless functions, do one of the following: To connect to one of those networks, ask the network administrator or the Internet Service Provider (ISP) for the security key or passphrase. 23 - Lenovo Yoga 2 Pro | User Guide - Lenovo Yoga 2 Pro - Page 28
Chapter 2. Starting to use Windows 8.1 Help and support If you have any problems using the operating system, see the Windows Help and Support file. To open the Windows Help and Support file, do one of the following: • Select the Settings charm, then select Help. • Press Windows key + Fn + F1. You - Lenovo Yoga 2 Pro | User Guide - Lenovo Yoga 2 Pro - Page 29
device. • Remove the removable hard disk drive before starting the Lenovo OneKey Recovery System. Otherwise, data from the removable hard disk drive might be lost. • The back-up process may take a while. • The back-up process is only available when Windows can be started normally. Restoring - Lenovo Yoga 2 Pro | User Guide - Lenovo Yoga 2 Pro - Page 30
Chapter 3. Lenovo OneKey Recovery System 3 Follow the on-screen instructions to restore the system partition to its • The above instructions should be followed when Windows can be started normally. If Windows cannot be started, then follow the steps below to start the Lenovo OneKey Recovery System: - Lenovo Yoga 2 Pro | User Guide - Lenovo Yoga 2 Pro - Page 31
your computer is preinstalled with a Windows operating system, Lenovo provides drivers for all the hardware devices that you need on the D partition of your hard disk. You can also download the latest device drivers from the Lenovo consumer support website. Lenovo OneKey Recovery System Where are - Lenovo Yoga 2 Pro | User Guide - Lenovo Yoga 2 Pro - Page 32
Troubleshooting Support. The legacy operating system, such as Windows, Linux or Dos, etc cannot be installed if you don't change the boot mode. Getting help How can I contact the customer support center? See "Chapter 3. Getting help and service" in the Lenovo Safety and General Information Guide - Lenovo Yoga 2 Pro | User Guide - Lenovo Yoga 2 Pro - Page 33
to your Windows environment or the entire contents of your hard disk to its original factory contents using the Lenovo OneKey Recovery System. If you still see only the cursor on the screen, have the computer serviced. The screen goes blank while the computer is on. Sleep problems • Your power - Lenovo Yoga 2 Pro | User Guide - Lenovo Yoga 2 Pro - Page 34
not reset, remove the AC power adapter. Display panel problems The screen is blank. • Do the following: - If you are using the AC power adapter or the battery, and the battery status indicator is on, press F12 ( ) to make the screen brighter. - If the power indicator is blinking, press the - Lenovo Yoga 2 Pro | User Guide - Lenovo Yoga 2 Pro - Page 35
4. Troubleshooting Battery problems Your computer shuts down before the battery status indicator shows empty. -orYour computer operates after the battery status indicator shows empty. Other problems Your computer does not respond. The connected external device does not work. • Recharge the battery - Lenovo Yoga 2 Pro | User Guide - Lenovo Yoga 2 Pro - Page 36
or registered trademarks of Lenovo in the United States, other countries, or both. Lenovo OneKey Microsoft and Windows are trademarks of Microsoft Corporation in the United States, other countries, or both. Other company, products, or service names may be trademarks or service marks of others. 32 - Lenovo Yoga 2 Pro | User Guide - Lenovo Yoga 2 Pro - Page 37
en-US Rev. AA00 ©Lenovo China 2013
-
 1
1 -
 2
2 -
 3
3 -
 4
4 -
 5
5 -
 6
6 -
 7
7 -
8
-
9
-
10
-
11
-
12
-
13
-
14
-
15
-
16
-
17
-
18
-
19
-
20
-
21
-
22
-
23
-
24
-
25
-
26
-
27
-
28
-
29
-
30
-
31
-
32
-
33
-
34
-
35
-
36
-
37
 |
 |

Lenovo Yoga 2 Pro
Read the safety notices and important tips in the
included manuals before using your computer.
13 inch Display
User Guide