LevelOne FCS-0020 User Manual - Page 10
Physical Details - FCS-0020/WCS-0020
 |
View all LevelOne FCS-0020 manuals
Add to My Manuals
Save this manual to your list of manuals |
Page 10 highlights
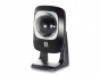
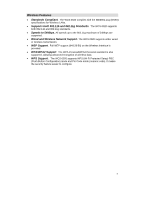
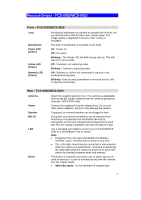
Physical Details - FCS-0020/WCS-0020 Front - FCS-0020/WCS-0020 Lens Microphone Power LED (Green) Active LED (Green) Network LED (Green) No physical adjustment is required or possible for the lens, but you should ensure that the lens cover remain clean. The image quality is degraded if the lens cover is dirty or smudged. The built-in microphone is mounted on the front. On - Power on. Off - No power. Blinking - The Power LED will blink during start up. This will take 15 to 20 seconds. Off - Camera is not capturing video. Blinking - Camera is capturing video Off - Wireless or LAN is not connected or camera is not sending/receiving data. Blinking - Data is being transmitted or received via the LAN or Wireless connection. Rear - FCS-0020/WCS-0020 Antenna Power Speaker MIC IN LAN Reset Attach the supplied antenna here. The antenna is adjustable; best results are usually obtained with the antenna positioned vertically. (WCS-0020 only) Connect the supplied 5V power adapter here. Do not use other power adapters; doing so may damage the camera. If required, an external speaker can be plugged in here. If required, an external microphone can be attached here. Attaching a microphone here will disable the built-in microphone on the front. Microphones designed to be used with PCs are usually compatible with this microphone input. Use a standard LAN cable to connect your FCS-0020/WCS0020 to a 10/100BaseT hub or switch. Note: • Plugging in the LAN cable will disable the Wireless interface. Only 1 interface can be active at any time. • The LAN cable should only be connected or disconnected when the camera is powered OFF. Attaching or detaching the LAN cable while the camera is powered on does NOT switch the interface between wired and wireless. This button is recessed; you need a pin or paper clip can be used to depress it. It can be activated at any time the camera is in the "ready" mode. • WPS PBC Mode. For the Wireless IP Camera with 4
-
 1
1 -
2
-
3
-
4
-
 5
5 -
 6
6 -
 7
7 -
 8
8 -
 9
9 -
 10
10 -
 11
11 -
 12
12 -
 13
13 -
 14
14 -
 15
15 -
16
-
17
-
18
-
19
-
20
-
21
-
22
-
23
-
24
-
25
-
26
-
27
-
28
-
29
-
30
-
31
-
32
-
33
-
34
-
35
-
36
-
37
-
38
-
39
-
40
-
41
-
42
-
43
-
44
-
45
-
46
-
47
-
48
-
49
-
50
-
51
-
52
-
53
-
54
-
55
-
56
-
57
-
58
-
59
-
60
-
61
-
62
-
63
-
64
-
65
-
66
-
67
-
68
-
69
-
70
-
71
-
72
-
73
-
74
-
75
-
76
-
77
-
78
-
79
-
80
-
81
-
82
-
83
-
84
-
85
-
86
-
87
 |
 |
