LevelOne KVM-0420 Manual - Page 9
Hotkey commands
 |
View all LevelOne KVM-0420 manuals
Add to My Manuals
Save this manual to your list of manuals |
Page 9 highlights
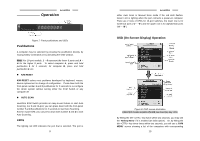
LevelOne non-volatile memory stores the CH Display setting. ! Position The position of the selected computer and/or OSD status displays on screen during operation. The actual display position shifts due to different VGA resolution, the higher the resolution the higher the displayed position. The non-volatile memory stores the Position setting. Upper Left, Upper Right, Lower Left, Lower Right. Middle. #Function key : To switch the Sun mark of a port on or off indicating the computer is a Sun server as shown in figure 9. Sun servers have more keys on the keyboard than a PC. When a Sun-marked port is selected, the KVM Switch starts to translate the keys from a PS/2 keyboard to a Sun keyboard. See Sun Keyboard Mapping for detail. Figure 9: OSD screen for Hybrid model and the Sun mark # ESC: To exit the OSD, press the key. 15 Hotkey commands LevelOne Hotkey command is a short keyboard sequence to select a computer, to activate computer scan, etc. The KVM switch interprets keystrokes for hotkeys all the time. A hotkey sequence starts with two left keystrokes followed by one or two more keystrokes. A built-in buzzer generates a high-pitch beep for correct hotkey command; otherwise, one low-pitch beep for error and the bad key sequence will not be forwarded to the selected computer. The short form hotkey menu can be turned on as an OSD function (: more\Hotkey Menu) every time the left key is pressed twice. L-CTRL: is the key located at the left side of the keyboard. 1~8/A~H: are the number keys '1' ~ '8' at the upper row of the keyboard and character keys 'A' ~ 'H' case insensitive. Do not use the keypad at the right of the keyboard. % To select a computer by hotkey command, you must know its port number, which is determined by the KVM Switch connection. For a computer connected to a Master, the label of 1~8 or A~H represent its port. For a computer connected to a Slave, two characters represent its port. The first character is the port number of the Master unit (1~8) and the second one is the port number of the Slave (1~8 or A~H). Please note that only Master's 'PC 1' ~'PC 8' ports can be connected to a Slave Left Ctrl + left Ctrl + 7 Selects a computer connected to port 7 of the Master. Left Ctrl + left Ctrl + 6 + C Selects a computer connected to port C of a Slave connected to port 6 of the Master. % To start Auto Scan, automatically scan power-on computers one by one at a fixed interval: Left Ctrl + left Ctrl + F 1 When Auto Scan detects any keyboard or mouse activity, it suspends the scanning till activity stops; it then resumes with the 16
-
 1
1 -
2
-
3
-
 4
4 -
 5
5 -
 6
6 -
 7
7 -
 8
8 -
 9
9 -
 10
10 -
 11
11 -
 12
12 -
 13
13 -
 14
14 -
15
-
16
-
17
 |
 |
