Lexmark 734DN Print Quality - Page 1
Lexmark 734DN - C Color Laser Printer Manual
 |
UPC - 734646086059
View all Lexmark 734DN manuals
Add to My Manuals
Save this manual to your list of manuals |
Page 1 highlights
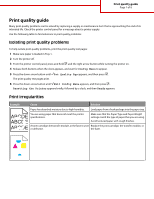
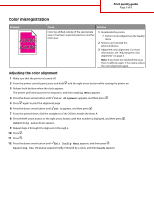
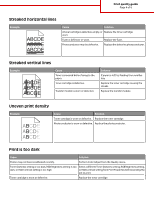
Print quality guide Page 1 of 8 Print quality guide Many print quality problems can be solved by replacing a supply or maintenance item that is approaching the end of its intended life. Check the printer control panel for a message about a printer supply. Use the following table to find solutions to print quality problems: Isolating print quality problems To help isolate print quality problems, print the print quality test pages: 1 Make sure paper is loaded in Tray 1. 2 Turn the printer off. 3 From the printer control panel, press and hold and the right arrow button while turning the printer on. 4 Release both buttons when the clock appears, and wait for Config Menu to appear. 5 Press the down arrow button until Prt Quality Pgs appears, and then press . The print quality test pages print. 6 Press the down arrow button until Exit Config Menu appears, and then press . Resetting the Printer appears briefly, followed by a clock, and then Ready appears. Print irregularities Example Cause Solution Paper has absorbed moisture due to high humidity. Load paper from a fresh package into the paper tray. ABC) D)E ABCDE ABCDE You are using paper that does not meet the printer specifications. A toner cartridge, the transfer module, or the fuser is worn or defective. Make sure that the Paper Type and Paper Weight settings match the type of paper that you are using. Avoid textured paper with rough finishes. Replace the print cartridge, the transfer module, or the fuser.
-
 1
1 -
 2
2 -
 3
3 -
 4
4 -
 5
5 -
 6
6 -
 7
7 -
8
 |
 |