Lexmark CX410 Quick Reference - Page 1
Lexmark CX410 Manual
 |
View all Lexmark CX410 manuals
Add to My Manuals
Save this manual to your list of manuals |
Page 1 highlights
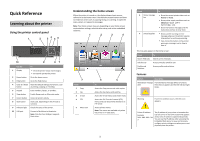
Quick Reference Learning about the printer Using the printer control panel Use the To 1 Display • View the printer status and messages. • Set up and operate the printer. 2 Home button Go to the home screen. 3 Help button Go to the Help menus. 4 Clear all / Reset Reset the default settings of a function, such button as printing, copying, or e-mailing. 5 Keypad Enter numbers, letters, or symbols. 6 Sleep button Enable Sleep mode or Hibernate mode. 7 Cancel button Cancel all printer activity. 8 Start button Start a job, depending on which mode is selected. 9 Indicator light Check the status of the printer. 10 USB port Connect a flash drive to the printer. Note: Only the front USB port supports flash drives. Understanding the home screen When the printer is turned on, the display shows a basic screen, referred to as the home screen. Use the home screen buttons and icons to initiate an action such as copying, faxing, or scanning; to open the menu screen; or respond to messages. Note: Your home screen may vary depending on your home screen customization settings, administrative setup, and active embedded solutions. Touch 1 Copy 2 Fax 3 E‑mail 4 FTP 5 Menu icon To Access the Copy menus and make copies. Access the Fax menus and send fax. Access the E-mail menus and send e‑mails. Access the File Transfer Protocol (FTP) menus and scan documents directly to an FTP server. Access printer menus. Note: The menus are available only when the printer is in ready state. 1 Touch 6 Status message bar 7 Status/Supplies To • Show the current printer status such as Ready or Busy. • Show printer supply conditions such as Imaging unit low or Cartridge Low. • Show intervention messages and the instructions on how to clear them. • Show a printer warning or error message whenever the printer requires intervention to continue processing. • View more information on the printer warning or message, and on how to clear it. This may also appear on the home screen: Touch Search Held Jobs Jobs by user Profiles and Solutions To Search current held jobs. Access print jobs saved by user. Access profiles and solutions. Features Feature Description Attendance message If an attendance message affects a function, alert then this icon appears and the red indicator light blinks. Warning If an error condition occurs, then this icon appears. Printer IP address Example: 123.123.123.12 3 The IP address of your printer is located at the top left corner of the home screen and appears as four sets of numbers separated by periods. You can use the IP address when accessing the Embedded Web Server to view and remotely configure printer settings even when you are not physically near the printer.
-
 1
1 -
 2
2 -
 3
3 -
 4
4 -
 5
5 -
 6
6 -
 7
7 -
8
-
9
-
10
-
11
-
12
-
13
-
14
-
15
-
16
-
17
-
18
-
19
-
20
-
21
-
22
 |
 |
