Lexmark CX410 Quick Reference - Page 2
Setting up and using the home, screen applications - wireless
 |
View all Lexmark CX410 manuals
Add to My Manuals
Save this manual to your list of manuals |
Page 2 highlights
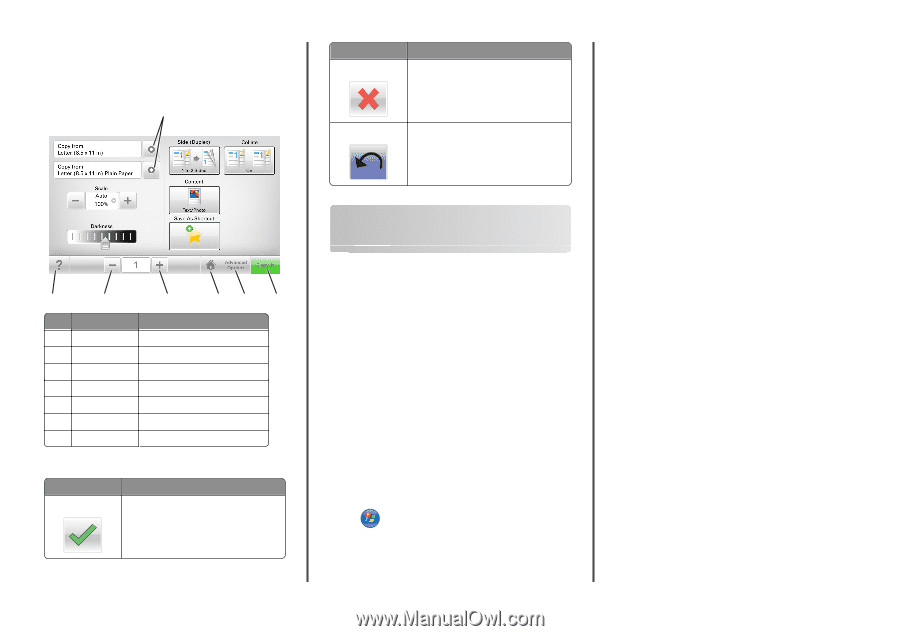
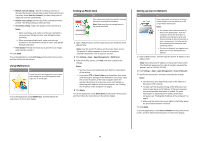
Using the touch-screen buttons Note: Your home screen, icons, and buttons may vary, depending on your home screen customization settings, administrative setup, and active embedded solutions. 1 7 6 5 43 2 Touch To 1 Arrows View a list of options. 2 Copy It Print a copy. 3 Advanced Options Select a copy option. 4 Home Go to the home screen. 5 Increase Select a higher value. 6 Decrease Select a lower value. 7 Tips Open a context-sensitive Help dialog. Other touch-screen buttons Touch Accept To Save a setting. Touch Cancel Reset To • Cancel an action or a selection. • Exit a screen and return to the previous screen without saving changes. Reset values on the screen. Setting up and using the home screen applications Notes: • Your home screen may vary, depending on your home screen customization settings, administrative setup, and active embedded applications. Some applications are supported only in select printer models. • There may be additional solutions and applications available for purchase. For more information, inquire at your point of purchase. Finding the IP address of the computer Note: Make sure that you know how your printer and computer are connected to the network (Ethernet or wireless). The computer IP address is required when setting up home screen applications, such as: • Forms and Favorites • Multi Send • Scan to Network For Windows users 1 Click , or click Start and then click Run. 2 In the Start Search or Run dialog, type cmd. 3 Press Enter, or click OK. 4 Type ipconfig, and then press Enter. 2 Note: Type ipconfig /all to see additional useful information. 5 Look for IP Address. The IP address appears as four sets of numbers separated by periods, such as 123.123.123.123. For Macintosh users Note: This is applicable only in Mac OS X version 10.5 or later. 1 From the Apple menu, navigate to: System Preferences > Network 2 Click Ethernet, Wi‑Fi, or AirPort. 3 Click Advanced > TCP/IP. 4 Look for IPv4 Address. Finding the IP address of the printer Note: Make sure your printer is connected to a network or to a print server. You can find the printer IP address: • From the top left corner of the printer home screen. • From the TCP/IP section in the Network/Ports menu. • By printing a network setup page or menu settings page, and then finding the TCP/IP section. Note: An IP address appears as four sets of numbers separated by periods, such as 123.123.123.123. Accessing the Embedded Web Server The Embedded Web Server is the printer Web page that lets you view and remotely configure printer settings even when you are not physically near the printer. 1 Obtain the printer IP address: • From the printer control panel home screen • From the TCP/IP section in the Network/Ports menu • By printing a network setup page or menu settings page, and then finding the TCP/IP section Note: An IP address appears as four sets of numbers separated by periods, such as 123.123.123.123. 2 Open a Web browser, and then type the printer IP address in the address field.
-
 1
1 -
 2
2 -
 3
3 -
 4
4 -
 5
5 -
 6
6 -
 7
7 -
 8
8 -
9
-
10
-
11
-
12
-
13
-
14
-
15
-
16
-
17
-
18
-
19
-
20
-
21
-
22
 |
 |