Lexmark CX517 User Guide - Page 187
Finishing menu, Printer Usage, Black Only Mode, Download Target, Notes, Resource Save, Print All Order
 |
View all Lexmark CX517 manuals
Add to My Manuals
Save this manual to your list of manuals |
Page 187 highlights
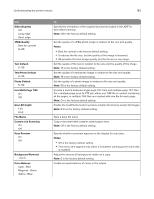
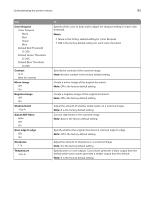
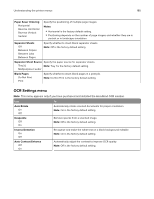
Understanding the printer menus 187 Use Printer Usage Max Yield Max Speed Black Only Mode On Off Download Target RAM Flash Disk Resource Save On Off Print All Order Alphabetical Oldest First Newest First Finishing menu Use Sides (Duplex) 1 sided 2 sided To Set the printer for a faster print speed or for a higher toner yield. Note: Max Yield is the factory default setting. Set the printer to print text and graphics using only the black toner cartridge. Note: Off is the factory default setting. Set the storage location for downloads. Notes: • RAM is the factory default setting. Storing downloads in the RAM is temporary. • Storing downloads in flash memory or on a printer hard disk places them in permanent storage. Downloads remain in flash memory or on the printer hard disk even when the printer is turned off. • This menu item appears only when a flash drive or a formatted, working printer hard disk is installed. Specify how the printer handles temporary downloads, such as fonts and macros stored in the RAM, when the printer receives a job that requires more memory than is available. Notes: • Off is the factory default setting. This sets the printer to retain the downloads only until memory is needed. Downloads are deleted in order to process print jobs. • On retains the downloads during language changes and printer resets. If the printer runs out of memory, then Memory Full [38] appears, and downloads are not deleted. Specify the order in which held and confidential jobs are printed when Print All is selected. Note: Alphabetical is the factory default setting. Print jobs always appear in alphabetical order on the printer control panel. To Specify whether two‑sided (duplex) printing is set as the default for all print jobs. Notes: • "1 sided" is the factory default setting. • You can set two‑sided printing from the printer software. For Windows users: Click File > Print, and then click Properties, Preferences, Options, or Setup. For Macintosh users: Choose File > Print, and then adjust the settings from the Print dialog and pop‑up menus.
-
 1
1 -
2
-
3
-
4
-
5
-
6
-
7
-
8
-
9
-
10
-
11
-
12
-
13
-
14
-
15
-
16
-
17
-
18
-
19
-
20
-
21
-
22
-
23
-
24
-
25
-
26
-
27
-
28
-
29
-
30
-
31
-
32
-
33
-
34
-
35
-
36
-
37
-
38
-
39
-
40
-
41
-
42
-
43
-
44
-
45
-
46
-
47
-
48
-
49
-
50
-
51
-
52
-
53
-
54
-
55
-
56
-
57
-
58
-
59
-
60
-
61
-
62
-
63
-
64
-
65
-
66
-
67
-
68
-
69
-
70
-
71
-
72
-
73
-
74
-
75
-
76
-
77
-
78
-
79
-
80
-
81
-
82
-
83
-
84
-
85
-
86
-
87
-
88
-
89
-
90
-
91
-
92
-
93
-
94
-
95
-
96
-
97
-
98
-
99
-
100
-
101
-
102
-
103
-
104
-
105
-
106
-
107
-
108
-
109
-
110
-
111
-
112
-
113
-
114
-
115
-
116
-
117
-
118
-
119
-
120
-
121
-
122
-
123
-
124
-
125
-
126
-
127
-
128
-
129
-
130
-
131
-
132
-
133
-
134
-
135
-
136
-
137
-
138
-
139
-
140
-
141
-
142
-
143
-
144
-
145
-
146
-
147
-
148
-
149
-
150
-
151
-
152
-
153
-
154
-
155
-
156
-
157
-
158
-
159
-
160
-
161
-
162
-
163
-
164
-
165
-
166
-
167
-
168
-
169
-
170
-
171
-
172
-
173
-
174
-
175
-
176
-
177
-
178
-
179
-
180
-
181
-
 182
182 -
 183
183 -
 184
184 -
 185
185 -
 186
186 -
 187
187 -
 188
188 -
 189
189 -
 190
190 -
 191
191 -
 192
192 -
193
-
194
-
195
-
196
-
197
-
198
-
199
-
200
-
201
-
202
-
203
-
204
-
205
-
206
-
207
-
208
-
209
-
210
-
211
-
212
-
213
-
214
-
215
-
216
-
217
-
218
-
219
-
220
-
221
-
222
-
223
-
224
-
225
-
226
-
227
-
228
-
229
-
230
-
231
-
232
-
233
-
234
-
235
-
236
-
237
-
238
-
239
-
240
-
241
-
242
-
243
-
244
-
245
-
246
-
247
-
248
-
249
-
250
-
251
-
252
-
253
-
254
-
255
-
256
-
257
-
258
-
259
-
260
-
261
-
262
-
263
-
264
-
265
-
266
-
267
-
268
-
269
-
270
-
271
-
272
-
273
-
274
-
275
-
276
-
277
-
278
-
279
-
280
-
281
-
282
-
283
-
284
-
285
-
286
-
287
-
288
-
289
-
290
-
291
-
292
-
293
-
294
-
295
-
296
-
297
-
298
-
299
-
300
-
301
-
302
-
303
-
304
-
305
-
306
-
307
-
308
-
309
-
310
-
311
-
312
-
313
-
314
-
315
-
316
-
317
-
318
-
319
-
320
-
321
-
322
-
323
-
324
-
325
-
326
-
327
-
328
-
329
-
330
-
331
-
332
-
333
-
334
-
335
-
336
-
337
-
338
 |
 |
