Lexmark E210 Setup Guide - Page 15
Connecting to the Computer with a Parallel Cable
 |
UPC - 734646229807
View all Lexmark E210 manuals
Add to My Manuals
Save this manual to your list of manuals |
Page 15 highlights
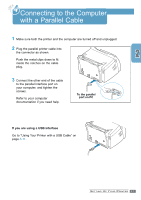
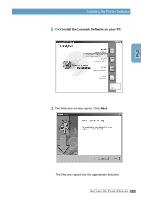
Connecting to the Computer with a Parallel Cable 1 Make sure both the printer and the computer are turned off and unplugged. 2 Plug the parallel printer cable into the connector as shown. Push the metal clips down to fit inside the notches on the cable plug. 3 Connect the other end of the cable to the parallel interface port on your computer, and tighten the screws. Refer to your computer documentation if you need help. To the parallel port on PC If you are using a USB interface Go to "Using Your Printer with a USB Cable" on page A.11. SETTING UP YOUR PRINTER 2.7
-
 1
1 -
2
-
3
-
4
-
5
-
6
-
7
-
8
-
9
-
 10
10 -
 11
11 -
 12
12 -
 13
13 -
 14
14 -
 15
15 -
 16
16 -
 17
17 -
 18
18 -
 19
19 -
 20
20 -
21
-
22
-
23
-
24
-
25
-
26
-
27
-
28
-
29
-
30
-
31
-
32
-
33
-
34
 |
 |

2.
7
Connecting to the Computer
with a Parallel Cable
1
Make sure both the printer and the computer are turned off and unplugged.
2
Plug the parallel printer cable into
the connector as shown.
Push the metal clips down to fit
inside the notches on the cable
plug.
3
Connect the other end of the cable
to the parallel interface port on
your computer, and tighten the
screws.
Refer to your computer
documentation if you need help.
To the parallel
port on PC
If you are using a USB interface
Go to “Using Your Printer with a USB Cable” on
page
A.11
.
S
ETTING
U
P
Y
OUR
P
RINTER