Lexmark Forms Printer 4227 Lexmark 4227 Plus User's Guide - Page 78
Adjusting Bidirectional Alignment
 |
View all Lexmark Forms Printer 4227 manuals
Add to My Manuals
Save this manual to your list of manuals |
Page 78 highlights
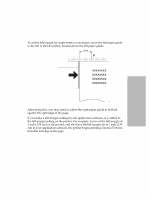
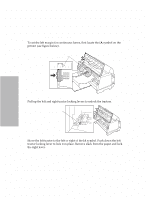
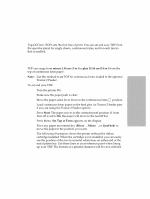
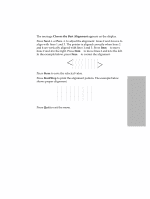
Selecting and Loading Paper Changing Tearoff position The paper must be setting at the current tearoff position in order to change the tearoff position. Pressing the Tear Off button toggles between TOF and the current tearoff position. Follow these steps to set the tearoff position: 1 Press Start/Stop to take the printer offline. 2 Press Micro ↓ or Micro ↑ to move the paper to the appropriate position on the tear bar. The printer beeps if you go out of range. 3 Press Start/Stop to set and save the tearoff position. SAVED appears on the display for one second. The printer beeps twice. The paper rolls backward, then goes to the new tearoff position. The Ready light goes on. Adjusting Bidirectional Alignment If your print job looks fuzzy or blurry, you may want to adjust the character alignment (also called bidirectional alignment) on your printer. The following steps illustrate how to adjust the alignment of the print wires. 1 After loading continuous forms, press Menu. 2 Press Item ↓ until Print Adjust appears on the display. 3 Press Next →. 4 Press Item ↓ or Item ↑ to choose Draft or Courier. Draft prints each alignment pattern once (uni-directional). Courier prints each alignment pattern twice (bidirectional). 5 Press Start/Stop to print the alignment pattern. The following example shows a printer that needs alignment. 72 Chapter 4: Selecting and Loading Paper
-
 1
1 -
2
-
3
-
4
-
5
-
6
-
7
-
8
-
9
-
10
-
11
-
12
-
13
-
14
-
15
-
16
-
17
-
18
-
19
-
20
-
21
-
22
-
23
-
24
-
25
-
26
-
27
-
28
-
29
-
30
-
31
-
32
-
33
-
34
-
35
-
36
-
37
-
38
-
39
-
40
-
41
-
42
-
43
-
44
-
45
-
46
-
47
-
48
-
49
-
50
-
51
-
52
-
53
-
54
-
55
-
56
-
57
-
58
-
59
-
60
-
61
-
62
-
63
-
64
-
65
-
66
-
67
-
68
-
69
-
70
-
71
-
72
-
 73
73 -
 74
74 -
 75
75 -
 76
76 -
 77
77 -
 78
78 -
 79
79 -
 80
80 -
 81
81 -
 82
82 -
 83
83 -
84
-
85
-
86
-
87
-
88
-
89
-
90
-
91
-
92
-
93
-
94
-
95
-
96
-
97
-
98
-
99
-
100
-
101
-
102
-
103
-
104
-
105
-
106
-
107
-
108
-
109
-
110
-
111
-
112
-
113
-
114
-
115
-
116
-
117
-
118
-
119
-
120
-
121
-
122
-
123
-
124
-
125
-
126
-
127
-
128
-
129
-
130
-
131
-
132
-
133
-
134
-
135
-
136
-
137
-
138
 |
 |