Lexmark Genesis S816 User Manual - Page 11
Use the, About your printer - printhead
 |
View all Lexmark Genesis S816 manuals
Add to My Manuals
Save this manual to your list of manuals |
Page 11 highlights
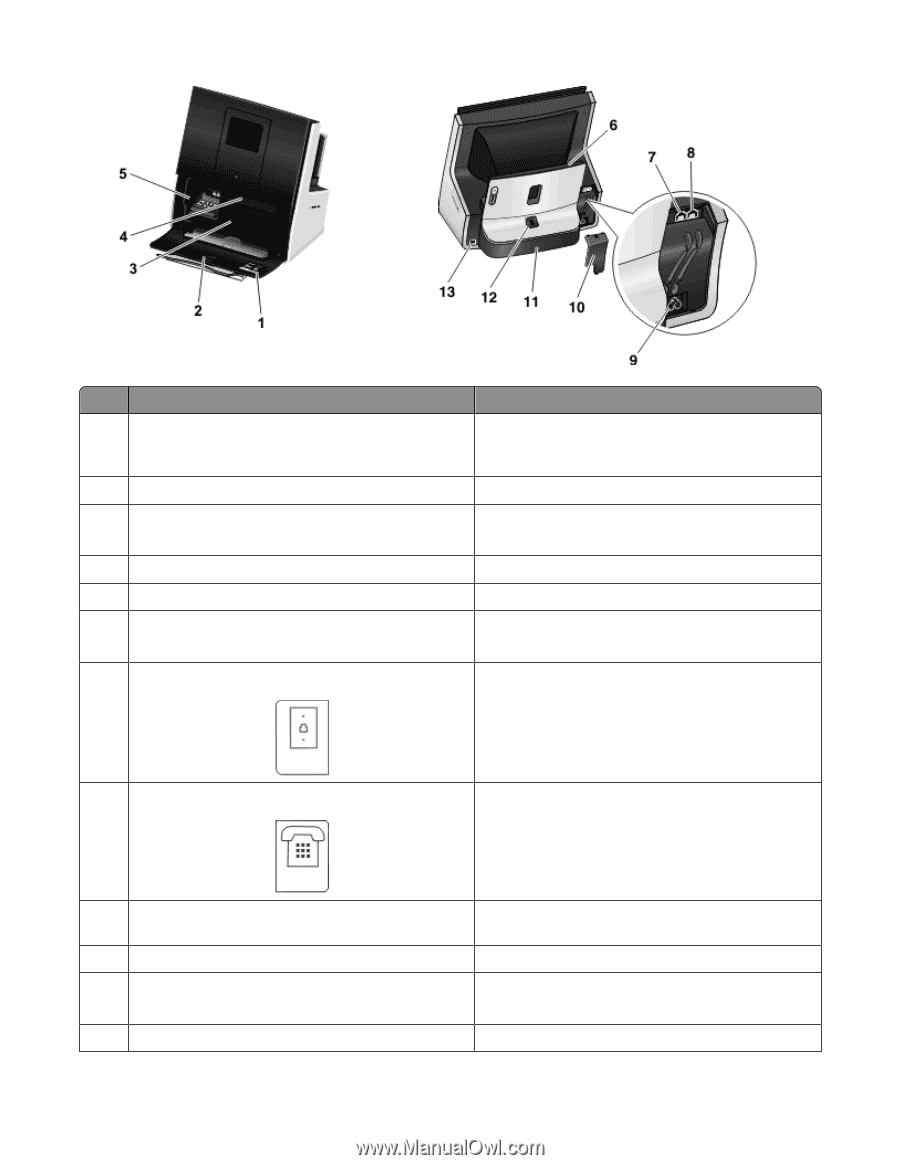
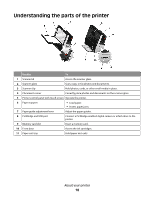
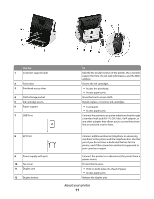
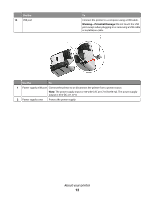
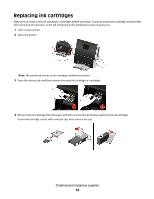
Use the 1 Customer support label 2 Front door 3 Printhead access door 4 Cloth storage pocket 5 Ink cartridge access 6 Paper support 7 LINE Port 8 EXT Port 9 Power supply with port 10 Fax cover 11 Duplex unit 12 Duplex button To Identify the model number of the printer, the customer support hot line, the ink tank information, and the MAC address. Access the ink cartridges. • Access the printhead. • Access paper jams. Store the touch-screen cloth. Install, replace, or remove ink cartridges. • Load paper. • Access paper jams. Connect the printer to an active telephone line through a standard wall jack (RJ-11), DSL filter, VoIP adapter, or any other adapter that allows you to access the phone line to send and receive faxes. Connect additional devices (telephone or answering machine) to the printer and the telephone line. Use this port if you do not have a dedicated fax line for the printer, and if this connection method is supported in your country or region. Connect the printer to or disconnect the printer from a power source. Protect the fax area. • Print on both sides of a sheet of paper. • Access paper jams. Release the duplex unit. About your printer 11
-
 1
1 -
2
-
3
-
4
-
5
-
 6
6 -
 7
7 -
 8
8 -
 9
9 -
 10
10 -
 11
11 -
 12
12 -
 13
13 -
 14
14 -
 15
15 -
 16
16 -
17
-
18
-
19
-
20
-
21
-
22
-
23
-
24
-
25
-
26
-
27
-
28
-
29
-
30
-
31
-
32
-
33
-
34
-
35
-
36
-
37
-
38
-
39
-
40
-
41
-
42
-
43
-
44
-
45
-
46
-
47
-
48
-
49
-
50
-
51
-
52
-
53
-
54
-
55
-
56
-
57
-
58
-
59
-
60
-
61
-
62
-
63
-
64
-
65
-
66
-
67
-
68
-
69
-
70
-
71
-
72
-
73
-
74
-
75
-
76
-
77
-
78
-
79
-
80
-
81
-
82
-
83
-
84
-
85
-
86
-
87
-
88
-
89
-
90
-
91
-
92
-
93
-
94
-
95
-
96
-
97
-
98
-
99
-
100
-
101
-
102
-
103
-
104
-
105
-
106
-
107
-
108
-
109
-
110
-
111
-
112
-
113
-
114
-
115
-
116
-
117
-
118
-
119
-
120
-
121
-
122
-
123
-
124
-
125
-
126
-
127
-
128
-
129
-
130
-
131
-
132
-
133
-
134
-
135
-
136
-
137
-
138
-
139
-
140
-
141
-
142
-
143
-
144
-
145
-
146
-
147
-
148
-
149
-
150
-
151
-
152
-
153
-
154
-
155
-
156
-
157
-
158
-
159
-
160
-
161
-
162
-
163
-
164
-
165
-
166
-
167
-
168
-
169
-
170
-
171
-
172
-
173
-
174
-
175
-
176
-
177
-
178
-
179
-
180
-
181
-
182
-
183
-
184
-
185
-
186
-
187
-
188
-
189
-
190
-
191
-
192
-
193
-
194
-
195
-
196
-
197
 |
 |