Lexmark Genesis S816 User Manual - Page 77
Setup 3: Printer is sharing the line with a telephone subscribed to voice mail, service
 |
View all Lexmark Genesis S816 manuals
Add to My Manuals
Save this manual to your list of manuals |
Page 77 highlights
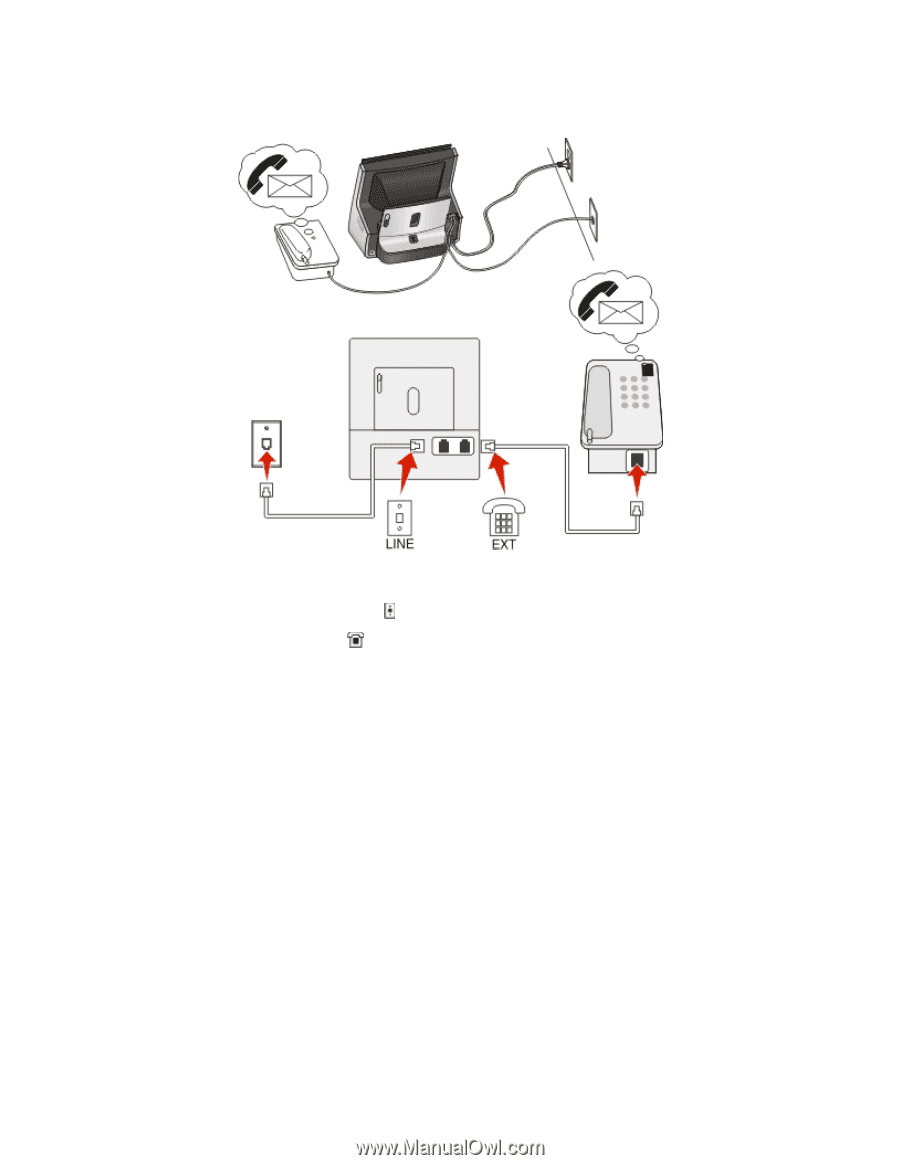
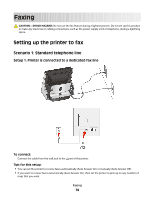
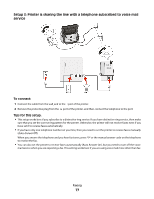
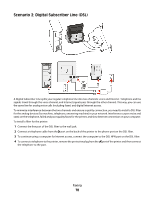
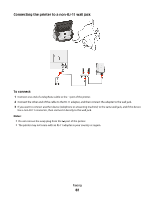
Setup 3: Printer is sharing the line with a telephone subscribed to voice mail service To connect: 1 Connect the cable from the wall jack to the port of the printer. 2 Remove the protective plug from the port of the printer, and then connect the telephone to the port. Tips for this setup: • This setup works best if you subscribe to a distinctive ring service. If you have distinctive ring service, then make sure that you set the correct ring pattern for the printer. Otherwise, the printer will not receive faxes even if you have set it to receive faxes automatically. • If you have only one telephone number on your line, then you need to set the printer to receive faxes manually (Auto Answer Off). When you answer the telephone and you hear fax tones, press *9* or the manual answer code on the telephone to receive the fax. • You can also set the printer to receive faxes automatically (Auto Answer On), but you need to turn off the voice mail service when you are expecting a fax. This setting works best if you are using voice mail more often than fax. Faxing 77
-
 1
1 -
2
-
3
-
4
-
5
-
6
-
7
-
8
-
9
-
10
-
11
-
12
-
13
-
14
-
15
-
16
-
17
-
18
-
19
-
20
-
21
-
22
-
23
-
24
-
25
-
26
-
27
-
28
-
29
-
30
-
31
-
32
-
33
-
34
-
35
-
36
-
37
-
38
-
39
-
40
-
41
-
42
-
43
-
44
-
45
-
46
-
47
-
48
-
49
-
50
-
51
-
52
-
53
-
54
-
55
-
56
-
57
-
58
-
59
-
60
-
61
-
62
-
63
-
64
-
65
-
66
-
67
-
68
-
69
-
70
-
71
-
 72
72 -
 73
73 -
 74
74 -
 75
75 -
 76
76 -
 77
77 -
 78
78 -
 79
79 -
 80
80 -
 81
81 -
 82
82 -
83
-
84
-
85
-
86
-
87
-
88
-
89
-
90
-
91
-
92
-
93
-
94
-
95
-
96
-
97
-
98
-
99
-
100
-
101
-
102
-
103
-
104
-
105
-
106
-
107
-
108
-
109
-
110
-
111
-
112
-
113
-
114
-
115
-
116
-
117
-
118
-
119
-
120
-
121
-
122
-
123
-
124
-
125
-
126
-
127
-
128
-
129
-
130
-
131
-
132
-
133
-
134
-
135
-
136
-
137
-
138
-
139
-
140
-
141
-
142
-
143
-
144
-
145
-
146
-
147
-
148
-
149
-
150
-
151
-
152
-
153
-
154
-
155
-
156
-
157
-
158
-
159
-
160
-
161
-
162
-
163
-
164
-
165
-
166
-
167
-
168
-
169
-
170
-
171
-
172
-
173
-
174
-
175
-
176
-
177
-
178
-
179
-
180
-
181
-
182
-
183
-
184
-
185
-
186
-
187
-
188
-
189
-
190
-
191
-
192
-
193
-
194
-
195
-
196
-
197
 |
 |