Lexmark MS725 Quick Reference - Page 2
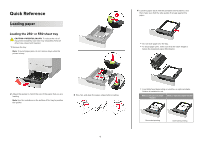
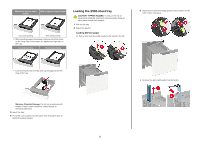
Loading the 2100-sheet tray, Loading A5, size paper
 |
View all Lexmark MS725 manuals
Add to My Manuals
Save this manual to your list of manuals |
Page 2 highlights
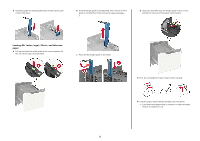
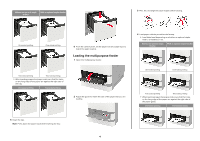
Without an optional staple finisher With an optional staple finisher Two‑sided printing Two‑sided printing • When loading prepunched paper, make sure that the holes on the long edge of the paper are against the right side of the tray. One‑sided printing Two‑sided printing Loading the 2100‑sheet tray CAUTION-TIPPING HAZARD: To reduce the risk of equipment instability, load each tray separately. Keep all other trays closed until needed. 1 Pull out the tray. 2 Adjust the guides. Loading A5‑size paper a Pull up and slide the width guide to the position for A5. b Squeeze and slide the length guide to the position for A5 until it clicks into place. • Load envelopes with the flap side up and against the left side of the tray. c Remove the A5 length guide from its holder. Warning-Potential Damage: Do not use envelopes with stamps, clasps, snaps, windows, coated linings, or self‑stick adhesives. 5 Insert the tray. 6 From the control panel, set the paper size and paper type to match the paper loaded. 2
-
 1
1 -
 2
2 -
 3
3 -
 4
4 -
 5
5 -
 6
6 -
 7
7 -
 8
8 -
9
-
10
-
11
-
12
-
13
-
14
-
15
 |
 |
