Lexmark MS725 Quick Reference - Page 5
Setting the paper size and type, Printing, Printing from a computer
 |
View all Lexmark MS725 manuals
Add to My Manuals
Save this manual to your list of manuals |
Page 5 highlights
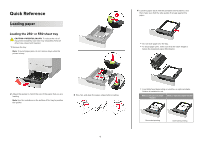
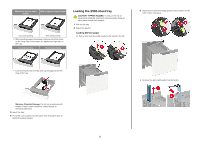
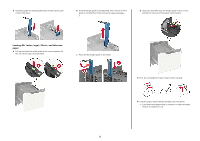
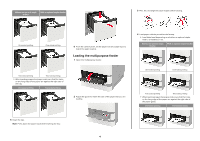
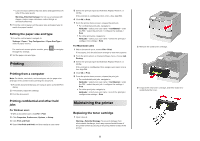
• Load envelopes with the flap side down and against the left side of the paper guide. Warning-Potential Damage: Do not use envelopes with stamps, clasps, snaps, windows, coated linings, or self‑stick adhesives. 5 From the control panel, set the paper size and paper type to match the paper loaded. Setting the paper size and type 1 From the control panel, navigate to: Settings > Paper > Tray Configuration > Paper Size/Type > select a paper source For non-touch-screen printer models, press through the settings. 2 Set the paper size and type. to navigate Printing Printing from a computer Note: For labels, card stock, and envelopes, set the paper size and type in the printer before printing the document. 1 From the document that you are trying to print, open the Print dialog. 2 If necessary, adjust the settings. 3 Print the document. Printing confidential and other held jobs For Windows users 1 With a document open, click File > Print. 2 Click Properties, Preferences, Options, or Setup. 3 Click Print and Hold. 4 Select Use Print and Hold, and then assign a user name. 5 Select the print job type (Confidential, Repeat, Reserve, or Verify). If the print job is confidential, then enter a four‑digit PIN. 6 Click OK or Print. 7 From the printer home screen, release the print job. • For confidential print jobs, navigate to: Held jobs > select your user name > Confidential > enter the PIN > select the print job > configure the settings > Print • For other print jobs, navigate to: Held jobs > select your user name > select the print job > configure the settings > Print For Macintosh users 1 With a document open, choose File > Print. If necessary, click the disclosure triangle to see more options. 2 From the print options or Copies & Pages menu, choose Job Routing. 3 Select the print job type (Confidential, Repeat, Reserve, or Verify). If the print job is confidential, then assign a user name and a four‑digit PIN. 4 Click OK or Print. 5 From the printer home screen, release the print job. • For confidential print jobs, navigate to: Held jobs > select your user name > Confidential > enter the PIN > select the print job > configure the settings > Print • For other print jobs, navigate to: Held jobs > select your user name > select the print job > configure the settings > Print Maintaining the printer Replacing the toner cartridge 1 Open door A. Warning-Potential Damage: To prevent damage from electrostatic discharge, touch any exposed metal frame of the printer before accessing or touching interior areas of the printer. 5 2 Remove the used toner cartridge. 3 Unpack the new toner cartridge, and then shake it to redistribute the toner.
-
 1
1 -
 2
2 -
 3
3 -
 4
4 -
 5
5 -
 6
6 -
 7
7 -
 8
8 -
 9
9 -
 10
10 -
 11
11 -
12
-
13
-
14
-
15
 |
 |
