Lexmark S315 User's Guide - Page 36
Using a flash drive with the printer, Printing photos from a flash drive, Select and Print
 |
View all Lexmark S315 manuals
Add to My Manuals
Save this manual to your list of manuals |
Page 36 highlights
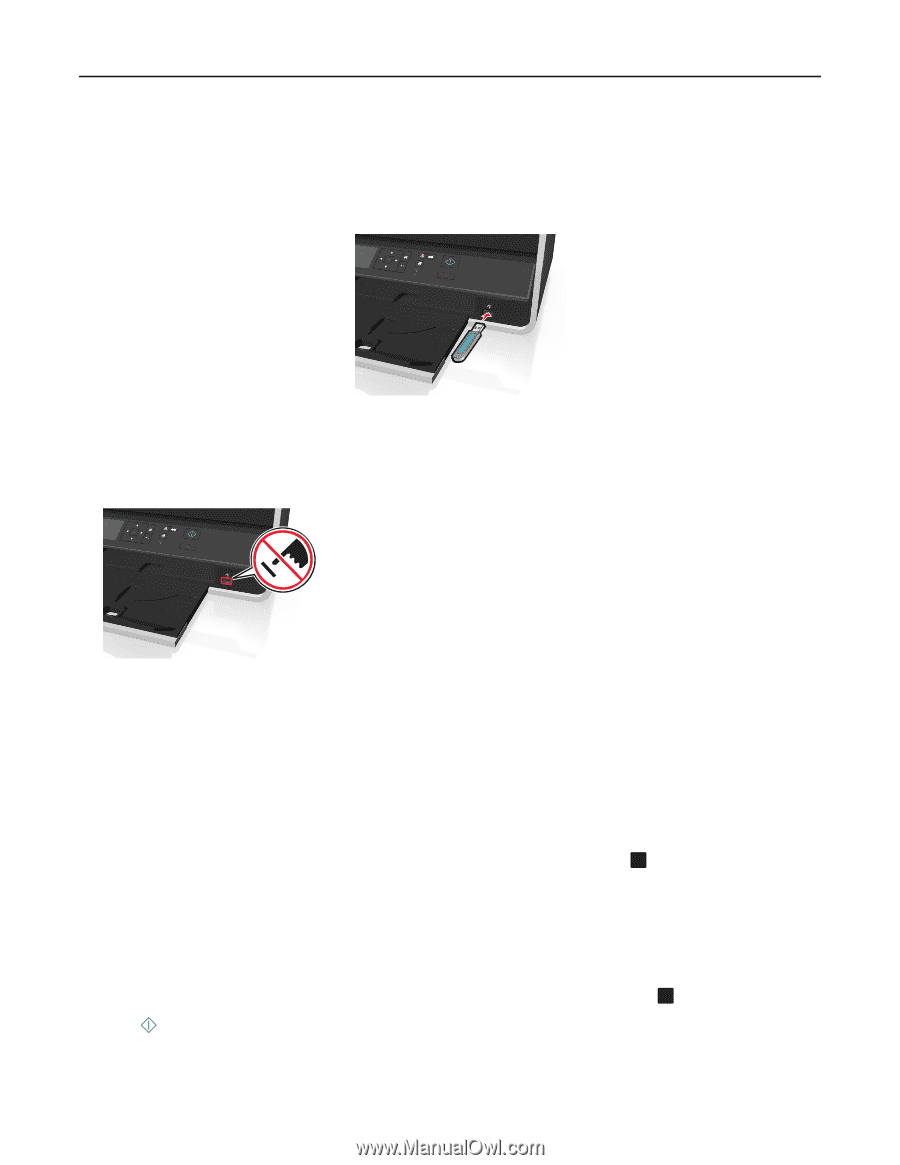
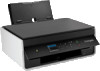
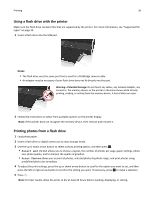
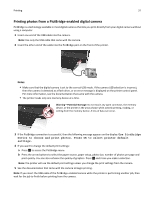
Printing 36 Using a flash drive with the printer Make sure the flash drive contains files that are supported by the printer. For more information, see "Supported file types" on page 35. 1 Insert a flash drive into the USB port. FLASH DRIVE Notes: • The flash drive uses the same port that is used for a PictBridge camera cable. • An adapter may be necessary if your flash drive does not fit directly into the port. Warning-Potential Damage: Do not touch any cables, any network adapter, any connector, the memory device, or the printer in the areas shown while actively printing, reading, or writing from the memory device. A loss of data can occur. 2 Follow the instructions or select from available options on the printer display. Note: If the printer does not recognize the memory device, then remove and reinsert it. Printing photos from a flash drive 1 Load photo paper. 2 Insert a flash drive or digital camera set to mass storage mode. 3 Use the up or down arrow button to select a photo printing option, and then press . OK • Select and Print allows you to choose a layout, the number of photos per page, paper settings, photo size, photo quality, and to sharpen the quality of graphics. • Print Photos allows you to print all photos, selected photos by photo range, and print photos using predefined photo size templates. 4 To adjust the print settings, press the up or down arrow button to scroll to the option you want to set, and then press the left or right arrow button to scroll to the setting you want. If necessary, press OK to make a selection. 5 Press . Note: For best results, allow the prints to dry at least 24 hours before stacking, displaying, or storing.
-
 1
1 -
2
-
3
-
4
-
5
-
6
-
7
-
8
-
9
-
10
-
11
-
12
-
13
-
14
-
15
-
16
-
17
-
18
-
19
-
20
-
21
-
22
-
23
-
24
-
25
-
26
-
27
-
28
-
29
-
30
-
 31
31 -
 32
32 -
 33
33 -
 34
34 -
 35
35 -
 36
36 -
 37
37 -
 38
38 -
 39
39 -
 40
40 -
 41
41 -
42
-
43
-
44
-
45
-
46
-
47
-
48
-
49
-
50
-
51
-
52
-
53
-
54
-
55
-
56
-
57
-
58
-
59
-
60
-
61
-
62
-
63
-
64
-
65
-
66
-
67
-
68
-
69
-
70
-
71
-
72
-
73
-
74
-
75
-
76
-
77
-
78
-
79
-
80
-
81
-
82
-
83
-
84
-
85
-
86
-
87
-
88
-
89
-
90
-
91
-
92
-
93
-
94
-
95
-
96
-
97
-
98
-
99
-
100
-
101
-
102
-
103
-
104
-
105
-
106
-
107
-
108
-
109
-
110
-
111
-
112
-
113
-
114
-
115
-
116
-
117
-
118
-
119
-
120
-
121
-
122
-
123
-
124
-
125
-
126
-
127
-
128
-
129
-
130
-
131
-
132
-
133
-
134
-
135
-
136
-
137
-
138
-
139
-
140
-
141
-
142
-
143
 |
 |