Lexmark X264dn Service Manual - Page 38
Changes Original Size, Paper Source, and Collate settings, Scan/Email button
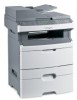 |
UPC - 734646140584
View all Lexmark X264dn manuals
Add to My Manuals
Save this manual to your list of manuals |
Page 38 highlights
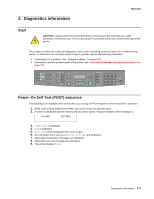
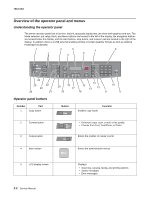
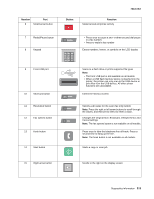
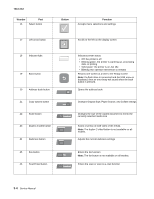
7013-XXX Number 16 Part Select button Button Function Accepts menu selections and settings 17 Left arrow button Scrolls to the left on the display screen 18 Indicator light 19 Back button 20 Address book button Indicates printer status: • Off: the printer is off • Blinking green: the printer is warming up, processing data, or printing • Solid green: the printer is on, but idle • Blinking red: operator intervention is needed Returns one screen at a time to the Ready screen Note: If a flash drive is connected and the USB menu is displayed, then an error beep will sound when the back button is pressed. Opens the address book 21 Copy options button Changes Original Size, Paper Source, and Collate settings Options 22 Scale button Scan/Email Changes the size of the copied document to fit into the currently selected media size 23 Duplex 2-sided button Duplex/2-Sided 24 Darkness button Darkness Scans or prints on both sides of the media. Note: The duplex 2-sided button is not available on all models. Adjusts the current darkness settings 25 Fax button 26 Scan/Email button Enters the fax function Fax Note: The fax button is not available on all models. Scan/Email Enters the scan or scan-to-e-mail function 2-4 Service Manual
-
 1
1 -
2
-
3
-
4
-
5
-
6
-
7
-
8
-
9
-
10
-
11
-
12
-
13
-
14
-
15
-
16
-
17
-
18
-
19
-
20
-
21
-
22
-
23
-
24
-
25
-
26
-
27
-
28
-
29
-
30
-
31
-
32
-
 33
33 -
 34
34 -
 35
35 -
 36
36 -
 37
37 -
 38
38 -
 39
39 -
 40
40 -
 41
41 -
 42
42 -
 43
43 -
44
-
45
-
46
-
47
-
48
-
49
-
50
-
51
-
52
-
53
-
54
-
55
-
56
-
57
-
58
-
59
-
60
-
61
-
62
-
63
-
64
-
65
-
66
-
67
-
68
-
69
-
70
-
71
-
72
-
73
-
74
-
75
-
76
-
77
-
78
-
79
-
80
-
81
-
82
-
83
-
84
-
85
-
86
-
87
-
88
-
89
-
90
-
91
-
92
-
93
-
94
-
95
-
96
-
97
-
98
-
99
-
100
-
101
-
102
-
103
-
104
-
105
-
106
-
107
-
108
-
109
-
110
-
111
-
112
-
113
-
114
-
115
-
116
-
117
-
118
-
119
-
120
-
121
-
122
-
123
-
124
-
125
-
126
-
127
-
128
-
129
-
130
-
131
-
132
-
133
-
134
-
135
-
136
-
137
-
138
-
139
-
140
-
141
-
142
-
143
-
144
-
145
-
146
-
147
-
148
-
149
-
150
-
151
-
152
-
153
-
154
-
155
-
156
-
157
-
158
-
159
-
160
-
161
-
162
-
163
-
164
-
165
-
166
-
167
-
168
-
169
-
170
-
171
-
172
-
173
-
174
-
175
-
176
-
177
-
178
-
179
-
180
-
181
-
182
-
183
-
184
-
185
-
186
-
187
-
188
-
189
-
190
-
191
-
192
-
193
-
194
-
195
-
196
-
197
-
198
-
199
-
200
-
201
-
202
-
203
-
204
-
205
-
206
-
207
-
208
-
209
-
210
-
211
-
212
-
213
-
214
-
215
-
216
-
217
-
218
-
219
-
220
-
221
-
222
-
223
-
224
-
225
-
226
-
227
-
228
-
229
-
230
-
231
-
232
-
233
-
234
-
235
-
236
-
237
-
238
-
239
-
240
-
241
-
242
-
243
-
244
-
245
-
246
-
247
-
248
-
249
-
250
 |
 |
