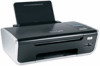
Lexmark X4690 User's Guide - Page 40
In Windows XP and earlier, Network and Internet Connections - windows 8
 |
View all Lexmark X4690 manuals
Add to My Manuals
Save this manual to your list of manuals |
Page 40 highlights
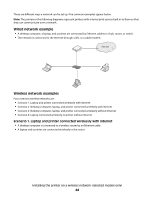
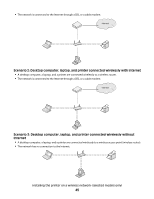
5 In the Connect to a Network dialog, click Set up a wireless ad-hoc (computer-to-computer) network, and then click Next. 6 Follow the instructions in the "Set up a wireless ad hoc network" wizard. As part of the setup: a Create a network name or SSID for the network between the computer and your printer. b Write the name of your network in the space provided so you can refer to it when running the wireless setup. Make sure you copy the exact spelling and capitalization. SSID (name of your wireless network) c Go to the Security Type drop-down list, choose WEP, and then create a security key (or password). WEP keys must be: • Exactly 10 or 26 hexadecimal characters. Hexadecimal characters are A-F, a-f, and 0-9. or • Exactly 5 or 13 ASCII characters. ASCII characters are letters, numbers, punctuation, and symbols found on a keyboard. Note: Security is optional for ad hoc networks. The range of an ad hoc network is much less than the range of an infrastructure network, making it less likely that intruders will connect to it without your knowledge. d Write the password for your network in the space provided so you can refer to it when running the wireless setup. Make sure you copy the exact spelling and capitalization. Security key (if network is secure) Windows Vista will enable the ad hoc network for you. It will appear in the "Connect to a network" dialog under "Available networks," indicating that the computer is configured for the ad hoc network. 7 Close the Control Panel and any remaining windows. 8 If this is the first time you will be setting up the printer for use on a wireless network, insert the installation software CD, and then follow the instructions on the Welcome screen. Otherwise: a Click . b Click All Programs. c Select the printer program folder, and then click Tools Lexmark Wireless Setup Utility. 9 When the available networks are displayed, provide the network name and the security information you created. The installer will configure the printer for use with your computer. 10 Store a copy of your network name and security information in a safe place for future reference. In Windows XP and earlier 1 Click Start. 2 Click Control Panel. 3 Click Network and Internet Connections. 4 Click Network Connections. 5 Right-click the icon for your wireless network connection. Installing the printer on a wireless network (selected models only) 40
-
 1
1 -
2
-
3
-
4
-
5
-
6
-
7
-
8
-
9
-
10
-
11
-
12
-
13
-
14
-
15
-
16
-
17
-
18
-
19
-
20
-
21
-
22
-
23
-
24
-
25
-
26
-
27
-
28
-
29
-
30
-
31
-
32
-
33
-
34
-
 35
35 -
 36
36 -
 37
37 -
 38
38 -
 39
39 -
 40
40 -
 41
41 -
 42
42 -
 43
43 -
 44
44 -
 45
45 -
46
-
47
-
48
-
49
-
50
-
51
-
52
-
53
-
54
-
55
-
56
-
57
-
58
-
59
-
60
-
61
-
62
-
63
-
64
-
65
-
66
-
67
-
68
-
69
-
70
-
71
-
72
-
73
-
74
-
75
-
76
-
77
-
78
-
79
-
80
-
81
-
82
-
83
-
84
-
85
-
86
-
87
-
88
-
89
-
90
-
91
-
92
-
93
-
94
-
95
-
96
-
97
-
98
-
99
-
100
-
101
-
102
-
103
-
104
-
105
-
106
-
107
-
108
-
109
-
110
-
111
-
112
-
113
-
114
-
115
-
116
-
117
-
118
-
119
-
120
-
121
-
122
-
123
-
124
-
125
-
126
-
127
-
128
-
129
-
130
-
131
-
132
-
133
-
134
-
135
-
136
-
137
-
138
-
139
-
140
-
141
-
142
-
143
 |
 |