Lexmark X6150 User's Guide - Page 18
Automatic Document, Feeder ADF - cartridges
 |
UPC - 734646683920
View all Lexmark X6150 manuals
Add to My Manuals
Save this manual to your list of manuals |
Page 18 highlights
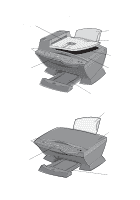
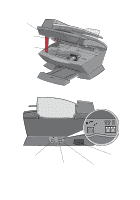
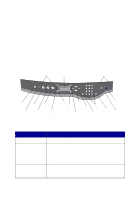
Use the: Automatic Document Feeder (ADF) ADF exit tray ADF input tray Display Control panel Paper exit tray Paper support Power supply connector Scanner lock Scanner support Scanner unit Telephone/answering machine port Top cover USB cable port Wall jack port When you want to: Copy or fax multiple pages. Pick up your original document after it has gone through the ADF. Load original documents in the All-In-One. Check the status of the All-In-One or view settings. Operate your All-In-One (attached to a computer or unattached). For more information, see page 13. Stack paper as it exits the All-In-One. Load paper in the All-In-One. Supply power to the All-In-One. Lock or unlock the scanner. Note: Lock the scanner if you are moving your All-In-One. Unlock the scanner before use. Keep the scanner unit open. • Install or change print cartridges. • Lock or unlock the scanner. Note: Lift the scanner unit to do these things. Connect an answering machine or telephone to your All-In-One. • Place an item on the scanner glass. • Remove an item from the scanner glass. Note: Lift or remove the top cover to do these things. Connect your All-In-One to a computer. Connect the telephone line. 12
-
 1
1 -
2
-
3
-
4
-
5
-
6
-
7
-
8
-
9
-
10
-
11
-
12
-
 13
13 -
 14
14 -
 15
15 -
 16
16 -
 17
17 -
 18
18 -
 19
19 -
 20
20 -
 21
21 -
 22
22 -
 23
23 -
24
-
25
-
26
-
27
-
28
-
29
-
30
-
31
-
32
-
33
-
34
-
35
-
36
-
37
-
38
-
39
-
40
-
41
-
42
-
43
-
44
-
45
-
46
-
47
-
48
-
49
-
50
-
51
-
52
-
53
-
54
-
55
-
56
-
57
-
58
-
59
-
60
-
61
-
62
-
63
-
64
-
65
-
66
-
67
-
68
-
69
-
70
-
71
-
72
-
73
-
74
-
75
-
76
-
77
-
78
-
79
-
80
-
81
-
82
-
83
-
84
-
85
-
86
-
87
-
88
-
89
-
90
-
91
-
92
-
93
-
94
-
95
-
96
-
97
-
98
-
99
-
100
-
101
-
102
-
103
-
104
-
105
-
106
-
107
-
108
-
109
-
110
-
111
-
112
-
113
-
114
-
115
-
116
-
117
-
118
-
119
-
120
-
121
 |
 |