Lexmark X945 Maintenance Manual - Page 11
Open Door E front door., If you are replacing the waste toner box
 |
View all Lexmark X945 manuals
Add to My Manuals
Save this manual to your list of manuals |
Page 11 highlights
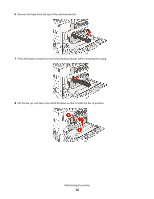
1 Open Door E (front door). Warning-Potential Damage: To avoid overexposing the photoconductors, do not leave the door open for more than 10 minutes. 2 Grasp the E6 Door tab, and then push the door down. 3 Remove the waste toner box. 4 Locate and remove the printhead lens cleaner from Door E. Note: If you are replacing the waste toner box, use the printhead lens cleaner that shipped with it. Maintaining the printer 11
-
 1
1 -
2
-
3
-
4
-
5
-
 6
6 -
 7
7 -
 8
8 -
 9
9 -
 10
10 -
 11
11 -
 12
12 -
 13
13 -
 14
14 -
 15
15 -
 16
16 -
17
-
18
-
19
-
20
-
21
-
22
-
23
-
24
-
25
 |
 |

1
Open Door E (front door).
Warning—Potential Damage:
To avoid overexposing the photoconductors, do not leave the door open for more
than 10 minutes.
2
Grasp the E6 Door tab, and then push the door down.
3
Remove the waste toner box.
4
Locate and remove the printhead lens cleaner from Door E.
Note:
If you are replacing the waste toner box, use the printhead lens cleaner that shipped with it.
Maintaining the printer
11