Lexmark X945 Maintenance Manual - Page 16
Lift the bar up, and then press latch E5 down so that it holds the bar in position.
 |
View all Lexmark X945 manuals
Add to My Manuals
Save this manual to your list of manuals |
Page 16 highlights
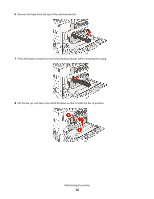
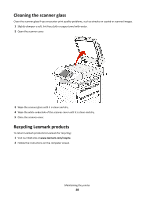
6 Remove the tape from the top of the photoconductor. 7 Press the button forward to insert the photoconductor while removing the casing. 8 Lift the bar up, and then press latch E5 down so that it holds the bar in position. Maintaining the printer 16
-
 1
1 -
2
-
3
-
4
-
5
-
6
-
7
-
8
-
9
-
10
-
 11
11 -
 12
12 -
 13
13 -
 14
14 -
 15
15 -
 16
16 -
 17
17 -
 18
18 -
 19
19 -
 20
20 -
 21
21 -
22
-
23
-
24
-
25
 |
 |

6
Remove the tape from the top of the photoconductor.
7
Press the button forward to insert the photoconductor while removing the casing.
8
Lift the bar up, and then press latch E5 down so that it holds the bar in position.
Maintaining the printer
16