Lexmark Z705 User's Guide for Mac OS 9 - Page 59
When I insert the printer software CD, nothing happens, Solving printer software installation problems - fax cartridges
 |
UPC - 734646890007
View all Lexmark Z705 manuals
Add to My Manuals
Save this manual to your list of manuals |
Page 59 highlights
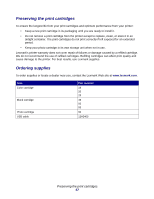
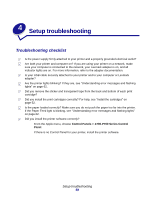
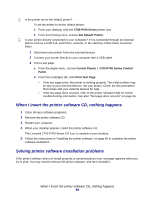
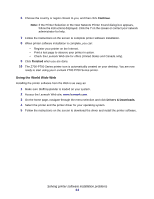
Is the printer set as the default printer? To set the printer to be the default printer: 1 From your desktop, click the Z700-P700 Series printer icon. 2 From the Printing menu, choose Set Default Printer. Is your printer directly connected to your computer? If it is connected through an external device such as a USB hub, switch box, scanner, or fax machine, follow these corrective steps: 1 Disconnect your printer from any external devices. 2 Connect your printer directly to your computer with a USB cable. 3 Print a test page. a From the Apple menu, choose Control Panels Z700-P700 Series Control Panel. b From the Cartridges tab, click Print Test Page. • If the test page prints, the printer is working properly. The initial problem may be due to your external devices, not your printer. Check the documentation that comes with your external devices for help. • If the test page does not print, refer to the printer software Help for further troubleshooting information. See also "Test page does not print" on page 64. When I insert the printer software CD, nothing happens 1 Close all open software programs. 2 Remove the printer software CD. 3 Restart your computer. 4 When your desktop appears, insert the printer software CD. The Lexmark Z700-P700 Series CD icon is created on your desktop. 5 Follow the instructions in "Installing the printer software" on page 60 to complete the printer software installation. Solving printer software installation problems If the printer software does not install properly, a communications error message appears when you try to print. You may need to remove the printer software, and then reinstall it. When I insert the printer software CD, nothing happens 59
-
 1
1 -
2
-
3
-
4
-
5
-
6
-
7
-
8
-
9
-
10
-
11
-
12
-
13
-
14
-
15
-
16
-
17
-
18
-
19
-
20
-
21
-
22
-
23
-
24
-
25
-
26
-
27
-
28
-
29
-
30
-
31
-
32
-
33
-
34
-
35
-
36
-
37
-
38
-
39
-
40
-
41
-
42
-
43
-
44
-
45
-
46
-
47
-
48
-
49
-
50
-
51
-
52
-
53
-
 54
54 -
 55
55 -
 56
56 -
 57
57 -
 58
58 -
 59
59 -
 60
60 -
 61
61 -
 62
62 -
 63
63 -
 64
64 -
65
-
66
-
67
-
68
-
69
-
70
-
71
-
72
-
73
-
74
-
75
-
76
-
77
-
78
-
79
-
80
-
81
 |
 |
