LiftMaster 8160W Owners Manual - Page 9
Assembly for Model: 8155W, 1 Attach the Rail to the Garage Door Opener, 2 Tighten the Belt
 |
View all LiftMaster 8160W manuals
Add to My Manuals
Save this manual to your list of manuals |
Page 9 highlights
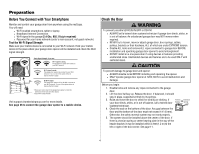
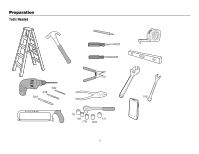
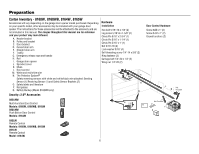
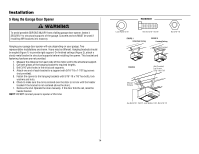
Assembly for Model: 8155W 1 Attach the Rail to the Garage Door Opener To avoid possible SERIOUS INJURY to finger from moving garage door opener: l ALWAYS keep hand clear of sprocket while operating opener. l Securely attach sprocket cover BEFORE operating. To avoid SERIOUS damage to garage door opener, use ONLY those bolts/fasteners mounted in the top of the opener. 2 Tighten the Belt 1. By hand, thread the spring trolley nut on the threaded shaft until it is finger tight against the trolley. Do not use any tools. 2. Insert a flathead screwdriver tip into one of the nut ring slots and brace it firmly against the trolley. 3. Tighten the spring trolley nut with an adjustable wrench or a 7/16" open end wrench about a quarter turn until the spring releases and snaps the nut ring against the trolley. This sets the spring to optimum belt tension. 1 (To motor unit) Spring Trolley Nut NOTE: ONLY use the bolts removed from the garage door opener. Place the garage door opener on the packing material to prevent scratching. 1. Remove the two bolts from the top of the garage door opener. 2. Align the rail and the styrofoam over the sprocket. Cut the tape from the rail, belt, and styrofoam. 3. Fasten the rail with the previously removed bolts. 4. Position the belt around the garage door opener sprocket. 5. Attach the sprocket cover over the garage door opener sprocket and attach with hex screws. Washered Bolts 5/16"-18 x 1/2" (Mounted in the garage door opener) Hex Screws 8 x 3/8" Sprocket Cover 2 Nut ring slot 3 Nut Ring Nut Ring BEFORE 1" (2.5 cm) AFTER RELEASE 1-1/4" (3.18 cm) 9
-
 1
1 -
2
-
3
-
 4
4 -
 5
5 -
 6
6 -
 7
7 -
 8
8 -
 9
9 -
 10
10 -
 11
11 -
 12
12 -
 13
13 -
 14
14 -
15
-
16
-
17
-
18
-
19
-
20
-
21
-
22
-
23
-
24
-
25
-
26
-
27
-
28
-
29
-
30
-
31
-
32
-
33
-
34
-
35
-
36
-
37
-
38
-
39
-
40
-
41
-
42
-
43
-
44
-
45
-
46
-
47
-
48
-
49
-
50
-
51
-
52
-
53
 |
 |