LiftMaster 8550 8550 Manual
LiftMaster 8550 Manual
 |
View all LiftMaster 8550 manuals
Add to My Manuals
Save this manual to your list of manuals |
LiftMaster 8550 manual content summary:
- LiftMaster 8550 | 8550 Manual - Page 1
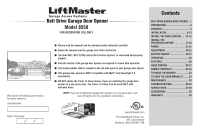
www.liftmaster.com The Chamberlain Group, Inc. 845 Larch Avenue Elmhurst, Illinois 60126-1196 Contents BELT DRIVE GARAGE DOOR OPENER.. 1 PREPARATION 2 ASSEMBLY 4 INSTALLATION 6-13 INSTALL THE DOOR CONTROL.....14-16 INSTALL THE PROTECTOR SYSTEM 17-20 POWER 21-22 ADJUSTMENT 23-25 BATTERY BACKUP - LiftMaster 8550 | 8550 Manual - Page 2
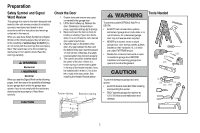
Preparation Safety Symbol and Signal Word Review This garage door opener has been designed and tested to offer safe service provided it is installed, operated, maintained and tested in strict accordance with the instructions and warnings contained in this manual. When you see these Safety Symbols - LiftMaster 8550 | 8550 Manual - Page 3
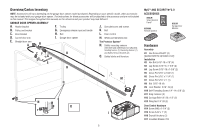
be included with your garage door opener. The instructions for these accessories will be attached to the accessory and are not included in this manual. The images throughout this manuals are for reference and your product may look different. GARAGE DOOR OPENER ASSEMBLY A. Header bracket B. Pulley - LiftMaster 8550 | 8550 Manual - Page 4
sprocket cover BEFORE sprocket. Cut the tape from the rail, belt, operating. and styrofoam. 1.3 Fasten the rail with the previously removed bolts. 1.4 Position the belt around the garage door To avoid SERIOUS damage to garage door opener, use ONLY those bolts/fasteners mounted in the top - LiftMaster 8550 | 8550 Manual - Page 5
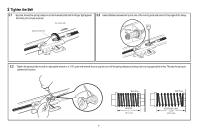
Nut ring slot 2.3 Tighten the spring trolley nut with an adjustable wrench or a 7/16" open end wrench about a quarter turn until the spring releases and snaps the nut ring against the trolley. This sets the spring to optimum belt tension. Nut Ring Nut Ring BEFORE 1" (2.5 cm) 5 AFTER RELEASE - LiftMaster 8550 | 8550 Manual - Page 6
• away from ALL moving parts of the door. 10. Place entrapment warning label on wall next to garage door control 11. Place manual release/safety reverse test label in plain view on inside of garage door. 12. Upon completion of installation, test safety reversal system. Door MUST reverse on.contact - LiftMaster 8550 | 8550 Manual - Page 7
or swinging garage doors. To be enabled ONLY when operating a sectional door. NOTE: If you are installing the garage door opener on a one-piece door, visit www.liftmaster.com for installation instructions. 1.1 Close the door and mark the inside vertical centerline of the garage door. 1.2 Extend the - LiftMaster 8550 | 8550 Manual - Page 8
attach the header bracket either to the wall above the garage door, or to the ceiling. Follow the instructions which will work best for your particular requirements. Do not install the header bracket over drywall. If installing into masonry, use concrete anchors (not provided). HARDWARE H3 (2) Lag - LiftMaster 8550 | 8550 Manual - Page 9
4 Position the garage door opener To prevent damage to garage door, rest garage door opener rail on 2x4 placed on top section of door. 4.1 Remove the packing material and lift the garage door opener onto a ladder. NOTE: A 2x4 is ideal for setting the distance between the rail and the door. If the - LiftMaster 8550 | 8550 Manual - Page 10
Bolt 5/16"- 18x7/8" Hanging the garage door opener will vary depending on your garage. Below are three example installations. Your installation may be different. For ALL installations the garage door opener MUST be connected to structural supports. The instructions illustrate one of the examples - LiftMaster 8550 | 8550 Manual - Page 11
6 Install the light bulbs 6.1 Pull on the top center of the light lens and from a falling garage door: • If possible, use emergency release handle to disengage trolley ONLY when garage door is CLOSED. Weak or broken springs or unbalanced door could result in an open door falling rapidly and/or - LiftMaster 8550 | 8550 Manual - Page 12
brace. For the vertical brace, 2 pieces of angle iron are used to create a U-shaped support. The best solution is to check with your garage door manufacturer for an opener installation door reinforcement kit. NOTE: Many door reinforcement kits provide for direct attachment of the clevis pin and - LiftMaster 8550 | 8550 Manual - Page 13
trolley release arm is horizontal. The (H2), nuts (H8) and lock washers (H9). trolley will re-engage automatically when the garage door opener is activated. . H8 H9 H2 If the straight door arm is hanging down too far, you may cut 6 inches (15 cm) from the solid end. 13 Trolley release arm - LiftMaster 8550 | 8550 Manual - Page 14
from a closing garage door: accessories. NOTE: Older LiftMaster accessories and third party products are not compatible.Your garage door opener is compatible with up to 2 Smart Control Panels or 4 of any other Security+®2.0 door controls. • Install door control within sight of garage door, out of - LiftMaster 8550 | 8550 Manual - Page 15
on the garage door opener. To insert or release wires from the terminal, push in the tab with screwdriver tip. RED WHITE WHITE GREY PRE-WIRED INSTALLATIONS: When wiring the door control to the garage door opener H17 make sure you use the same wires that are connected to the door control. 15 - LiftMaster 8550 | 8550 Manual - Page 16
Install the Door Control 3 Attach the warning labels 3.1 Attach the entrapment warning label on the wall near the door control with tacks or staples. 3.2 Attach the manual release/safety reverse test label in a visible location on the inside of the garage door. 16 - LiftMaster 8550 | 8550 Manual - Page 17
mode until the garage door opener has completed 5 cycles upon power up. When installing the safety reversing sensors check the following: • Sensors are installed inside the garage, one on either side of the door. • Sensors are facing each other with the lenses aligned and the receiving sensor lens - LiftMaster 8550 | 8550 Manual - Page 18
the Protector System® 1 Install the Safety Reversing Sensors The safety reversing sensors can be attached to the door track, the wall, or the floor. If the door track will not support the sensor bracket a wall installation is recommended. Choose one of the following installations. HARDWARE H12 - LiftMaster 8550 | 8550 Manual - Page 19
has wires installed for the safety reversing sensors, refer to the instructions on the following page. 2.1A Run the wire from both sensors to the garage door opener. Attach the wire to the wall and ceiling with the staples (H17). 2.2A Strip 7/16 inch (11 mm) of insulation from each set of wires - LiftMaster 8550 | 8550 Manual - Page 20
System® OPTION B PRE-WIRED INSTALLATION 2.1B Cut the end of the safety reversing sensor wire, making sure there is enough wire to reach the pre-installed Safety reversing sensor wires Purple (for example) Pre-installed wires 2.4B At the garage door opener, strip 7/16 inch (11 mm) of insulation - LiftMaster 8550 | 8550 Manual - Page 21
circuit. 1.2B Remove the garage door opener cover and set aside. 1.3B Remove the attached green ground terminal. 1.4B Cut black and white wires and strip away 1/2" (1 cm) of insulation, 3" (7.5 cm) before spade terminals. 1.5B Remove the power cord from opener. 1.6B Install a conduit or flex cable - LiftMaster 8550 | 8550 Manual - Page 22
steadily if they are aligned and installed and aligned correctly. wired correctly. When the light beam is obstructed or misaligned while the door is closing, the door will reverse and the garage door opener lights will flash ten times. If the door is already open, it will not close. The sensors - LiftMaster 8550 | 8550 Manual - Page 23
. The electronic controls sense the amount of force required to open and close the door. The force is adjusted automatically when you program the travel and cannot be changed. PROGRAMMING BUTTONS The programming buttons are located on the left side panel of the garage door opener and are used - LiftMaster 8550 | 8550 Manual - Page 24
(refer to page 18). When the sensors are aligned and unobstructed, cycle the door through a complete up and down cycle using the remote control or the UP and DOWN buttons. Programming is complete. If you are unable to operate the door up and door, repeat the steps for Programming the Travel. 24 - LiftMaster 8550 | 8550 Manual - Page 25
Protector System 3.1 Open the door. Place the garage door opener carton in the path of the door. Without a properly installed safety reversing sensor, persons (particularly small children) could be SERIOUSLY INJURED or KILLED by a closing garage door. 3.2 Press the remote control push button to - LiftMaster 8550 | 8550 Manual - Page 26
BEFORE performing ANY service or maintenance. • Use ONLY LiftMaster part # 485LM for replacement battery. • Do NOT dispose of battery in fire. Battery may explode. Check with local codes for disposal instructions. 1 Install the battery 1.1 Unplug the garage door opener. 1.2 Open the light lens - LiftMaster 8550 | 8550 Manual - Page 27
hold a charge and needs to be replaced. Please call for replacement battery to allow your system to operate during a power outage. CHARGE THE BATTERY The battery will take 24 hours to fully charge. A fully charged battery supplies 12V DC to the garage door opener for one to two days of normal - LiftMaster 8550 | 8550 Manual - Page 28
AND FOLLOW ALL WARNINGS AND INSTRUCTIONS. 2. ALWAYS keep remote controls out of reach of children. NEVER permit children to operate or play with garage door control push buttons or remote controls. 3. ONLY activate garage door when it can be seen clearly, it is properly adjusted, and there are no - LiftMaster 8550 | 8550 Manual - Page 29
+®2.0 door controls. Your garage door opener has already been programmed at the factory to operate with your remote control, which changes with each use, randomly accessing over 100 billion new codes. The garage door opener is compatible with up to 40 remote controls. THE PROTECTOR SYSTEM® (SAFETY - LiftMaster 8550 | 8550 Manual - Page 30
a problem with the garage door opener the screen will display the Diagnostic Code. Refer to the Troubleshooting section. The following features are accessible through the screen using the navigation buttons: LEARN A DEVICE Any compatible remote controls, wireless keyless entry, or MyQ™ accessories - LiftMaster 8550 | 8550 Manual - Page 31
to operate the garage door opener. PROGRAM: Add remote controls, MyQ™ devices, an extra remote button to control your garage door CONTRAST: Adjust the contrast of the screen. opener lights, or a keyless entry. DISPLAY ERROR: Displays any errors that have occurred. To program a remote control or - LiftMaster 8550 | 8550 Manual - Page 32
press the ENTER button. The garage door opener lights will flash (or two clicks will be heard) when the code has been programmed. Repeat the steps above for programming additional remote controls or keyless entry devices. If programming is unsuccessful, program the remote using the learn button. OR - LiftMaster 8550 | 8550 Manual - Page 33
hold the learn button on garage door opener until the learn LED goes out (approximately 6 seconds). All remote control and keyless entry codes are now erased. Reprogram any accessory you wish to use. ERASE ALL DEVICES 1 Press and hold the learn button on garage door opener until the learn LED goes - LiftMaster 8550 | 8550 Manual - Page 34
consider replacing the battery to ensure the garage door opener will operate during an electrical power outage. NOTICETo complywith FCC and or IndustryCanada rules(IC), adjustment or modifications of this receiver and/or transmitter are prohibited, except for changing the code setting or replacing - LiftMaster 8550 | 8550 Manual - Page 35
's path while closing. Close the garage door using the remote control or the door control. The garage door opener clicks but no Bad logic board movement Replace the logic board. 1-5 1 FLASH 5 FLASHES The opener runs approximately 6-8" Communication error to Disconnect all power, remove cover - LiftMaster 8550 | 8550 Manual - Page 36
Troubleshooting DIAGNOSTIC UP CODE ARROW DOWN ARROW SYMPTOM CAUSE RESOLUTION 3-3 3 FLASHES 3 FLASHES The garage door opener is idle and the battery LED is constantly flashing green Battery LED flashing Replace the logic board. Green, charging circuit stops and starts to drain causing - LiftMaster 8550 | 8550 Manual - Page 37
For installation and service information call: 1-800-528-9131 Or visit us online at: www.liftmaster.com Before calling, please have the model number of the garage door opener. If you are calling about a Troubleshooting issue, it is recommended that you have access to your garage door opener while - LiftMaster 8550 | 8550 Manual - Page 38
Parts Garage Door Opener Parts 11 9 4 3 1 12 5 2 10 4 3 7 8 6 38 DESCRIPTION 1 Sprocket and Sprocket Cover with Screws 2 End Panel with labels, battery 10 Receiver Logic Board 11 Line Cord 12 Filter Board with Screws NOT SHOWN Wire Harness with Screws Battery Backup PART NUMBER 41C589 - LiftMaster 8550 | 8550 Manual - Page 39
+®2.0 remote control or a MyQ™ Internet Gateway. Garage Door Monitor: 895MAX Monitor open/closed status for up to 4 MyQ™ compatible garage door openers and close them from anywhere in the home. SECURITY+®2.0 3-Button Remote Control: Compatible with LiftMaster® garage door openers manufactured - LiftMaster 8550 | 8550 Manual - Page 40
FOR REINSTALLING A REPAIRED OR REPLACED UNIT, REPLACEMENT OF BATTERIES IN REMOTE CONTROL TRANSMITTERS AND LIGHT BULBS OR UNITS INSTALLED FOR NONRESIDENTIAL USE. THIS LIMITED WARRANTY DOES NOT COVER ANY PROBLEMS WITH, OR RELATING TO, THE GARAGE DOOR OR GARAGE DOOR HARDWARE, INCLUDING BUT NOT LIMITED
-
 1
1 -
 2
2 -
 3
3 -
 4
4 -
 5
5 -
 6
6 -
 7
7 -
8
-
9
-
10
-
11
-
12
-
13
-
14
-
15
-
16
-
17
-
18
-
19
-
20
-
21
-
22
-
23
-
24
-
25
-
26
-
27
-
28
-
29
-
30
-
31
-
32
-
33
-
34
-
35
-
36
-
37
-
38
-
39
-
40
 |
 |
Serial Number:
Date of Purchase:
Belt Drive Garage Door Opener
The Chamberlain Group, Inc.
845 Larch Avenue
Elmhurst, Illinois 60126-1196
www.liftmaster.com
.
Write down the following information
for future reference:
NOTE:
If you are installing the garage door opener on a one-piece door, visit
www.liftmaster.com for installation instructions.
Contents
Model 8550
FOR RESIDENTIAL USE ONLY
BELT DRIVE GARAGE DOOR OPENER .. 1
PREPARATION
.............................
2
ASSEMBLY
.................................
4
INSTALLATION
........................
6-13
INSTALL THE DOOR CONTROL
.....
14-16
INSTALL THE
PROTECTOR SYSTEM
®
..............
17-20
POWER
................................
21-22
ADJUSTMENT
.........................
23-25
BATTERY BACKUP
...................
26-27
OPERATION
...............................
28
FEATURES
.................................
29
DOOR CONTROL
.....................
30-31
REMOTE CONTROLS
.................
32-33
TO ERASE THE MEMORY
...............
33
TO OPEN THE DOOR MANUALLY
......
34
MAINTENANCE
...........................
34
TROUBLESHOOTING
.................
35-36
REPAIR PARTS
.......................
37-38
ACCESSORIES
............................
39
WARRANTY
...............................
40
■
Please read this manual and the enclosed safety materials carefully!
■
Fasten the manual near the garage door after installation.
■
The door WILL NOT CLOSE unless the Protector System
®
is connected and properly
aligned.
■
Periodic checks of the garage door opener are required to ensure safe operation.
■
The model number label is located on the left side panel of your garage door opener.
■
This garage door opener is ONLY compatible with MyQ
™
and Security
✚
®
2.0
accessories.
■
DO NOT enable the Timer-To-Close feature if you are installing the garage door
opener on a one-piece door. The Timer -To-Close is to be used ONLY with
sectional doors.