LiftMaster HCTDCU HCTDCU Installation Manual - Page 21
Liftmaster Internet Gateway(not Provided), Erase All Codes, Erase Limits
 |
View all LiftMaster HCTDCU manuals
Add to My Manuals
Save this manual to your list of manuals |
Page 21 highlights
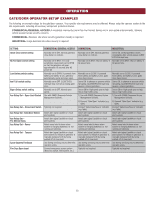
PROGRAMMING LIFTMASTER INTERNET GATEWAY (NOT PROVIDED) You will need a broadband internet connection and a Wi-Fi® router to use the LiftMaster Internet Gateway. To program the operator to the LiftMaster Internet Gateway: PROGRAM MyQ® USING THE LEARN BUTTON ON THE OPERATOR'S CONTROL BOARD 1. Connect the ethernet cable to the LiftMaster Internet Gateway and the router. 2. Connect power to the LiftMaster Internet Gateway. 3. Create an online account by visiting myLiftMaster.com. 4. Register the LiftMaster Internet Gateway. 5. Use an internet enabled computer or smartphone to add devices. The LiftMaster Internet Gateway will stay in learn mode for three minutes. 6. Press the Learn button on the operator twice (the operator will beep as it enters programming mode). The LiftMaster Internet Gateway will pair to the operator if it is within range and the operator will beep if programming is successful. ERASE ALL CODES 1. Press and release the LEARN button (operator will beep and green XMITTER LED will light). 2. Press and hold the LEARN button again until the green XMITTER LED flashes and then release the button (approximately 6 seconds). All remote control codes are now erased. ERASE LIMITS 1. To erase the limits, press and hold the SET OPEN and SET CLOSE buttons simultaneously (5 seconds) until both the SET OPEN and SET CLOSE LEDs blink rapidly and the operator beeps. 2. Release the buttons and the SET OPEN and SET CLOSE LEDs will blink slowly indicating the limits will need to be set. TO REMOVE AND ERASE MONITORED ENTRAPMENT PROTECTION DEVICES PROGRAM MyQ® FROM EXTERNAL RESET BUTTON OR 3-BUTTON CONTROL STATION 1. Connect the ethernet cable to the LiftMaster Internet Gateway and the router. 2. Connect power to the LiftMaster Internet Gateway. 3. Create an online account by visiting myLiftMaster.com. 4. Register the LiftMaster Internet Gateway. 5. Use an internet enabled computer or smartphone to add devices. The LiftMaster Internet Gateway will stay in learn mode for three minutes. 6. Ensure gate/door is closed. 7. Give the operator an OPEN command. 8. Within 30 seconds, when the gate/door is at the open limit press and release the reset/stop button 3 times to put the operator into High Band Learn Mode (the operator will beep as it enters learn mode). The LiftMaster Internet Gateway will pair to the operator if it is within range and the operator will beep if programming is successful. The status as shown by the LiftMaster Internet Gateway app will be either "open" or "closed". The gate/door operator can then be controlled through the LiftMaster Internet Gateway app. 1. Remove the entrapment protection device wires from the terminal block. 2. Press and release the SET OPEN and SET CLOSE buttons simultaneously. The SET OPEN and SET CLOSE LEDs will turn on (entering learn limit mode). 3. Press and release both SET OPEN and SET CLOSE buttons again to turn off the SET OPEN and SET CLOSE LEDs (exiting learn limit mode). 21
-
 1
1 -
2
-
3
-
4
-
5
-
6
-
7
-
8
-
9
-
10
-
11
-
12
-
13
-
14
-
15
-
 16
16 -
 17
17 -
 18
18 -
 19
19 -
 20
20 -
 21
21 -
 22
22 -
 23
23 -
 24
24 -
 25
25 -
 26
26 -
27
-
28
-
29
-
30
-
31
-
32
-
33
-
34
-
35
-
36
-
37
-
38
-
39
-
40
-
41
-
42
-
43
-
44
-
45
-
46
-
47
-
48
-
49
-
50
-
51
-
52
-
53
-
54
-
55
-
56
-
57
-
58
-
59
-
60
-
61
-
62
-
63
-
64
-
65
-
66
-
67
-
68
-
69
-
70
-
71
-
72
-
73
-
74
-
75
-
76
-
77
-
78
-
79
-
80
-
81
-
82
-
83
-
84
-
85
-
86
-
87
-
88
-
89
-
90
-
91
-
92
 |
 |
