Linksys WAP54GX User Guide - Page 16
Connect the Network Cable to the Router or, Switch Screen, Point Screen - wizard
 |
UPC - 745883565740
View all Linksys WAP54GX manuals
Add to My Manuals
Save this manual to your list of manuals |
Page 16 highlights
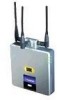
Wireless-G Access Point with SRX 3. Optimally, you should set up the Access Point using a PC on your wired network. Connect a network cable to your network router or switch. Then click the Next button. Figure 5-2: Connect the Network Cable to the Router or Switch Screen 4. The screen shows how the Access Point should be connected as you run the Setup Wizard. Connect the other end of the network cable to the Access Point's Ethernet network port. Then click the Next button. Chapter 5: Setting up the Wireless-G Access Point with SRX Using the Setup Wizard Figure 5-3: Connect the Network Cable to the Access Point Screen 10
-
 1
1 -
2
-
3
-
4
-
5
-
6
-
7
-
8
-
9
-
10
-
 11
11 -
 12
12 -
 13
13 -
 14
14 -
 15
15 -
 16
16 -
 17
17 -
 18
18 -
 19
19 -
 20
20 -
 21
21 -
22
-
23
-
24
-
25
-
26
-
27
-
28
-
29
-
30
-
31
-
32
-
33
-
34
-
35
-
36
-
37
-
38
-
39
-
40
-
41
-
42
-
43
-
44
-
45
-
46
-
47
-
48
-
49
-
50
-
51
-
52
-
53
-
54
-
55
-
56
-
57
-
58
-
59
-
60
-
61
-
62
-
63
-
64
 |
 |

10
Chapter 5: Setting up the Wireless-G Access Point with SRX
Using the Setup Wizard
Wireless-G Access Point with SRX
3.
Optimally, you should set up the Access Point using a PC on your wired network. Connect a network cable to
your network router or switch. Then click the
Next
button.
4.
The screen shows how the Access Point should be connected as you run the Setup Wizard. Connect the other
end of the network cable to the Access Point’s Ethernet network port. Then click the
Next
button.
Figure 5-2: Connect the Network Cable to the Router or
Switch Screen
Figure 5-3: Connect the Network Cable to the Access
Point Screen