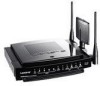
Linksys WRT600N User Guide - Page 38
How to Create a User Group, Return, Upper, Folder, Create, Cancel Changes, Close, Storage, Create New
 |
UPC - 745883573134
View all Linksys WRT600N manuals
Add to My Manuals
Save this manual to your list of manuals |
Page 38 highlights
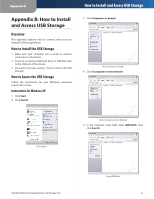
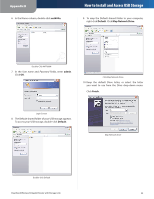
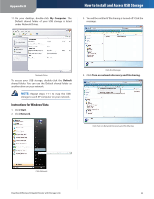
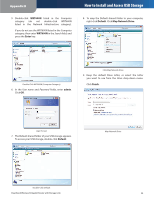
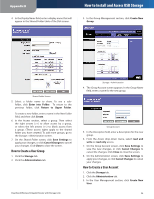
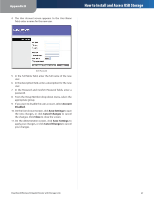
Appendix B 4. In the Display Name field, enter a display name that will appear in the Shared Folder table of the Disk screen. How to Install and Access USB Storage 3. In the Group Management section, click Create New Group. Shared Folder Screen 5. Select a folder name to share. To see a subfolder, click Enter into Folder. To return to the previous folder, click Return to Upper Folder. To create a new folder, enter a name in the New Folder field, and then click Create. 6. In the Access section, select a group. Then select the right arrows (>>) to allow access by a group, or select the left arrows ( Administration 4. The Group Account screen appears. In the Group Name field, enter a name for the new group. Group Account 5. In the Description field, enter a description for the new group. 6. From the Access drop-down menu, select read and write or read only access. 7. On the Group Account screen, click Save Settings to save the new changes, or click Cancel Changes to cancel the changes. Click Close to close the screen. 8. On the Administration screen, click Save Settings to apply your changes, or click Cancel Changes to cancel your changes. How to Create a User Account 1. Click the Storage tab. 2. Click the Administration tab. 3. In the User Management section, click Create New User. 36
-
 1
1 -
2
-
3
-
4
-
5
-
6
-
7
-
8
-
9
-
10
-
11
-
12
-
13
-
14
-
15
-
16
-
17
-
18
-
19
-
20
-
21
-
22
-
23
-
24
-
25
-
26
-
27
-
28
-
29
-
30
-
31
-
32
-
 33
33 -
 34
34 -
 35
35 -
 36
36 -
 37
37 -
 38
38 -
 39
39 -
 40
40 -
 41
41 -
 42
42 -
 43
43 -
44
-
45
-
46
-
47
 |
 |
