Logitech Transporter SE Owners Guide - Page 6
Configuring Transporter - transporter server
 |
View all Logitech Transporter SE manuals
Add to My Manuals
Save this manual to your list of manuals |
Page 6 highlights
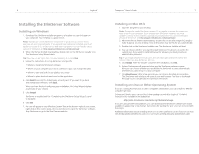
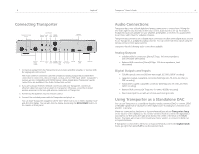
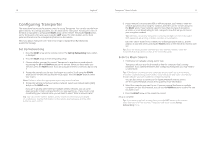
10 Logitech® Configuring Transporter The instructions below use the remote control to set up Transporter. You can also use the front panel controls. To scroll up and down, turn the knob on the front panel. Pressing the center of the knob is equivalent to pressing the RIGHT arrow on the remote. Pressing the BACK button on the front panel is the same as pressing the LEFT arrow. The other buttons on the front panel are the same as the corresponding buttons on the remote. When you plug in Transporter, the Slim Devices logo is displayed briefly, followed by a welcome message. Set Up Networking 1. Press the RIGHT arrow on the remote control. The Set Up Networking menu option is displayed. 2. Press the RIGHT arrow to enter networking setup. 3. Choose whether you want to connect Transporter to a wireless or wired network by pressing the UP and DOWN arrows on the remote. When you have made your selection, press the RIGHT arrow. If you are using an ethernet connection, skip to step 7. 4. Transporter prompts you for your local region or country. Scroll using the DOWN arrow on the remote until you find the local region. Press the RIGHT arrow to select your region. Note: Failure to select the appropriate region may violate local laws. 5. Transporter will scan to find your wireless network. Select your network name (SSID) and press the RIGHT arrow. If you are in an area where there are multiple wireless networks, you can scroll down using the remote until you find the one you want to use. If your router is not broadcasting your network name, you will need to select "Enter a network name". Tip: You can use the number buttons on the remote to enter text as you might on a cell phone. Use the PLAY button on the remote as a backspace and the ADD button to insert a letter. Transporter™ Owner's Guide 11 6. If your network is secured with WEP or WPA encryption, you'll need to enter the network password or key using the numbers and letters on the remote and press the RIGHT arrow. If your network supports more than one type of encryption at a time or is not broadcasting its SSID, Transporter may first ask you to choose your encryption method. Tip: WEP keys consist of a string of ten or twenty-six digits or letters A through F. WPA passwords are a string of letters, numbers or punctuation. Enter the subnet mask for the network, the default gateway IP address, and the address of your DNS server, pressing the RIGHT arrow on the remote to move to each one. Tip: If you are having trouble connecting to your wireless network, check the Frequently Asked Questions section at the end of this guide. Select a Music Source 1. If SlimServer isn't already running, start it now. Transporter will scan your local network to find the computer that's running SlimServer. If you started SlimServer after configuring Transporter, you may need to scroll to find it. Tip: If SlimServer is running on your computer and you don't see it in this menu, check the Troubleshooting section at the end of this guide and make sure that any firewall software you have installed is configured properly. You can also choose to connect to the SqueezeNetwork internet service. See the SqueezeNetwork section of this guide for more information. 2. Select the computer you want to use. If you are running SlimServer on multiple computers on your local network, you can use the DOWN arrow to scroll to the one you want to use. 3. Press the RIGHT arrow on the remote to connect. Setup is complete. Tip: If you want to go back to setup later press the LEFT arrow on the remote down and hold it for five seconds. Transporter will return to the Set Up Networking menu.
-
 1
1 -
 2
2 -
 3
3 -
 4
4 -
 5
5 -
 6
6 -
 7
7 -
 8
8 -
 9
9 -
 10
10 -
 11
11 -
 12
12 -
13
-
14
-
15
-
16
-
17
-
18
-
19
-
20
-
21
 |
 |
