MSI U110 User Manual - Page 68
Place the All-in-one
 |
View all MSI U110 manuals
Add to My Manuals
Save this manual to your list of manuals |
Page 68 highlights
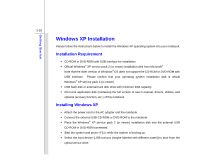
Getting Started 3-30 Š Delete any existing partition while the Windows® XP installation screen appears. Note that it is strongly recommended to back up the data that stored in the attached external hard disk drive or the USB flash drive. Š Press and select [Format the partition using the NTFS file system] to start the installation of Windows® XP operating system. Š Follow the on-screen instructions to continue and complete the installation process. Š Restart the system and enter the Windows® XP operating system. Place the All-in-one application disk of this notebook into the external USB CD-ROM or DVD-ROM. Š Follow the Driver Installation Wizard to install all drivers.
-
 1
1 -
2
-
3
-
4
-
5
-
6
-
7
-
8
-
9
-
10
-
11
-
12
-
13
-
14
-
15
-
16
-
17
-
18
-
19
-
20
-
21
-
22
-
23
-
24
-
25
-
26
-
27
-
28
-
29
-
30
-
31
-
32
-
33
-
34
-
35
-
36
-
37
-
38
-
39
-
40
-
41
-
42
-
43
-
44
-
45
-
46
-
47
-
48
-
49
-
50
-
51
-
52
-
53
-
54
-
55
-
56
-
57
-
58
-
59
-
60
-
61
-
62
-
 63
63 -
 64
64 -
 65
65 -
 66
66 -
 67
67 -
 68
68 -
 69
69 -
 70
70 -
 71
71 -
 72
72 -
 73
73 -
74
-
75
-
76
-
77
-
78
-
79
 |
 |

3-30
Getting Started
Delete any existing partition while the Windows
®
XP installation screen appears.
Note that it is strongly recommended to back up the data that stored in the attached external
hard disk drive or the USB flash drive.
Press <Enter> and select [Format the partition using the NTFS file system] to start the
installation of Windows
®
XP operating system.
Follow the on-screen instructions to continue and complete the installation process.
Restart the system and enter the Windows
®
XP operating system.
Place the All-in-one
application disk of this notebook into the external USB CD-ROM or DVD-ROM.
Follow the Driver Installation Wizard to install all drivers.