MSI Z270 SLI PLUS User Manual - Page 86
M.2 PCIe SSD RAID, Creating a M.2 PCIe SSD RAID Volume
 |
View all MSI Z270 SLI PLUS manuals
Add to My Manuals
Save this manual to your list of manuals |
Page 86 highlights
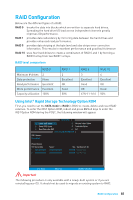
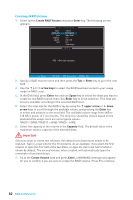
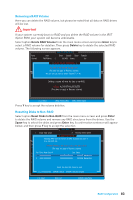
M.2 PCIe SSD RAID You can create M.2 PCIe SSD RAID volume with UEFI BIOS. Creating a M.2 PCIe SSD RAID Volume 1. Access the BIOS setup 2. Switch to Advanced Mode by pressing F7 key. 3. Go to SETTINGS > Advanced > Windows OS Configuration. 4. Set Windows 8.1/10 WHQL Support to Enabled. 5. Go to SETTINGS > Advanced > Integrated Peripherals. Setting\Advanced\Integrated Peripherals SATA Configuration SATA Mode M2_1 Pcie Storage Remapping M2_2 Pcie Storage Remapping [RAID Mode] [Enabled] [Enabled] 6. Set SATA Mode to RAID Mode. 7. Set both M2_1 Pcie Storage Remapping and M2_2 Pcie Storage Remapping to Enabled. 8. Press F10 to save and exit and then press the Enter key to select Yes. 9. Reboot the system and access the BIOS setup again. 10. Switch to Advanced Mode by pressing F7 key. 11. Go to SETTINGS > Advanced > Intel(R) Rapid Storage Technology. 12. Select Create RAID Volume and press Enter key. ...\Intel(R) Rapid Storage Technology\ Create RAID Volume Create RAID Volume Name: RAID Level: Volume1 [RAID0(Stripe)] Select Disks: PCIe, XXXXX XXXXXXXX-XXXX, XXXGB [X] PCIe, XXXXX XXXXXXXX-XXXX, XXXGB [X] Strip Size: Capacity (MB): [XXKB] XXXXXX Create Volume 13. Enter in a volume name. 14. Select the RAID level. 15. Use Space key to select the both PCIe SSDs. 16. If creating RAID 0, select the Strip Size; it is recommended that it be left at the default value. 17. Go to the Create Volume field and press Enter. 86 RAID Configuration
-
 1
1 -
2
-
3
-
4
-
5
-
6
-
7
-
8
-
9
-
10
-
11
-
12
-
13
-
14
-
15
-
16
-
17
-
18
-
19
-
20
-
21
-
22
-
23
-
24
-
25
-
26
-
27
-
28
-
29
-
30
-
31
-
32
-
33
-
34
-
35
-
36
-
37
-
38
-
39
-
40
-
41
-
42
-
43
-
44
-
45
-
46
-
47
-
48
-
49
-
50
-
51
-
52
-
53
-
54
-
55
-
56
-
57
-
58
-
59
-
60
-
61
-
62
-
63
-
64
-
65
-
66
-
67
-
68
-
69
-
70
-
71
-
72
-
73
-
74
-
75
-
76
-
77
-
78
-
79
-
80
-
 81
81 -
 82
82 -
 83
83 -
 84
84 -
 85
85 -
 86
86 -
 87
87 -
 88
88 -
 89
89 -
 90
90 -
 91
91 -
92
 |
 |
