Mackie Mix5 Owners Manual - Page 14
Tape In, 23. Tape Out, 24. Tape to Main, 25. Tape to CR / Phones, 26. CR / Phones - review
 |
View all Mackie Mix5 manuals
Add to My Manuals
Save this manual to your list of manuals |
Page 14 highlights
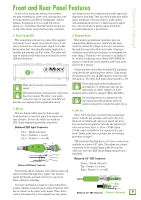
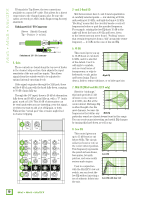
Mix5 • Mix8 • Mix12FX 22. Tape In 25. Tape to CR / Phones Connect computer audio outputs, or tape recorder's outputs here, using standard hi-fi (RCA) cables. Use these jacks for convenient playback of your mixes. You'll be able to review a mix then try another pass without repatching or disturbing the mixer levels. You can also use these jacks with an MP3 player, CD player or laptop to feed m usic to a PA system between sets. RCA plugs are unbalanced. Connect the signal to the center post and the ground (earth) or shield to the surrounding "basket." Be sure the cables are wired per AES (Audio Engineering Society) standards: Push this button in to route the tape in signal to the control room and phones. When the switch is up [disengaged], the control room, phones and meters receive the main mix signal tapped after the main mix control. When the switch is down [engaged], the control room, phones and meters receive the MP3/CD/tape input signal. This is especially useful for auditioning or cueing up house music to play in between sets. WARNING: Turn down the control room / phones knob before engaging this switch. Unbalanced RCA Connector Sleeve - Shield (Ground) Tip - Positive (+ or hot) SLEEVE TIP SLEEVE TIP Unbalanced RCA Connector 23. Tape Out Unbalanced RCA connections tap the main mix output to make simultaneous recording and PA work more convenient. Connect these to your laptop or standalone recorder's inputs. Mono Out: If you want to feed a mono signal to your standalone recorder or other device, simply use a stereo RCA to mono 1/8" cord to combine these outputs. Do not attempt this with any other outputs on a Mix Series mixer. OO OO U 27 +15 AUX MASTER 48V CR / PHONES 26 MAX 29 -OL +6 0 -20 MAIN MIX 28 +10 OO 25 TO CR / PHONES 24 TO MAIN L 22 23 R IN OUT 24. Tape to Main Push this button in to route the tape in signal to the main mix. WARNING: Pushing in the tape to main button may create a feedback path between tape in and tape out. Make sure the tape deck is not in record mode, record-pause mode, or input monitor mode before this switch is engaged. 14 Mix5 • Mix8 • Mix12FX 26. CR / Phones As you might expect, this knob controls the levels of both the stereo control room and the headphones outputs. Make sure that you move it to minimum before adding a new source. Whatever your selection, you can also use the control room outputs for other applications. The sound quality is just as impeccable as the main outputs. It can be used as an additional main mix output and this one will have its own level control. 27. Aux Master [Mix8 only] This knob provides overall level control of the aux send, just before it's delivered to the aux send output. This knob goes from off (turned fully down), to unity gain at the center, with 15 dB of extra gain (turned fully up). You may never need the additional gain, but here it is anyway.
-
 1
1 -
2
-
3
-
4
-
5
-
6
-
7
-
8
-
 9
9 -
 10
10 -
 11
11 -
 12
12 -
 13
13 -
 14
14 -
 15
15 -
 16
16 -
 17
17 -
 18
18 -
 19
19 -
20
-
21
-
22
-
23
-
24
 |
 |
