Mackie Mix5 Owners Manual - Page 9
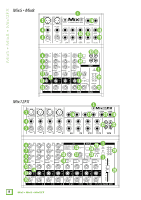
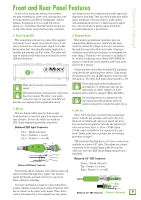
Front and Rear Panel Features, 1. Power In and LED, 2. Mic Ins, 3. Phantom Power, 4. Line Ins - mixer stand
 |
View all Mackie Mix5 manuals
Add to My Manuals
Save this manual to your list of manuals |
Page 9 highlights
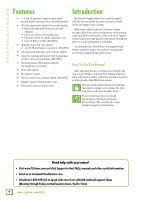
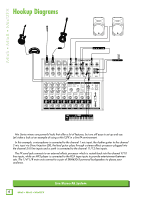
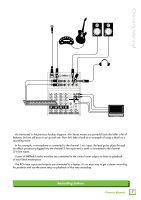
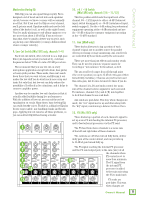
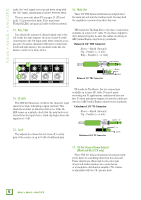
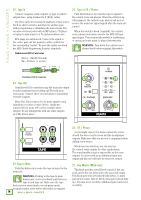
Owner's Manual Front and Rear Panel Features At the risk of stating the obvious, this is where you plug everything in: power cord, microphones, linelevel instruments and effects, headphones, and the ultimate destination for your sound: PA system, laptop, etc. All features described in this section are on top of the mixer, except for the power connector. into balanced mic-level outputs and provide signal and impedance matching. They also let you send your gifted guitar renditions over long cables or audio snakes, with minimum interference or high-frequency signal loss. Ask your dealer or guitar maker about their recommendations for a good DI box. 1. Power In and LED This connection is where you connect the supplied external AC power supply to provide AC power to the mixer. Connect the external power supply to the Mix Series mixer first, then plug the power supply into a suitable and properly rated AC outlet. The mixer will turn on automatically when connected and the power LED will illuminate. 3. Phantom Power Most modern professional condenser mics are equipped for phantom power, which lets the mixer send low-current DC voltage to the mic's electronics through the same wires that carry audio. (Semi-pro condenser mics often have batteries to accomplish the same thing.) "Phantom" owes its name to an ability to be "unseen" by dynamic mics (Shure SM57/SM58, for instance), which don't need external power and aren't affected by it anyway. Phantom power on the Mix8 and Mix12FX is globally 1 controlled by the phantom power switch. (This means the phantom power for all XLR inputs is turned on and off together.) The Mix5 XLR input always provides +15V. Make sure to use the correct external power supply. Mix mixers feature varying power connectors based on country. Therefore, your power connector may (or may not) look different than the one displayed in the illustration above. Never plug s ingle-ended (unbalanced) microphones, or ribbon mics into the mic input jacks of a Mix5 [always] or if the phantom power switch is engaged [Mix8, Mix12FX]. Do not plug instrument outputs into the mic input jacks with phantom power on unless you know for certain it is safe to do so. 2. Mic Ins This is a female XLR connector that accepts a balanced mic or line level input from almost any type of source. Be sure the cables are wired per AES (Audio Engineering Society) standards: Balanced XLR Input Connector Pin 1 - Shield (Ground) Pin 2 - Positive (+ or hot) Pin 3 - Negative (- or cold) SHIELD 2 HOT COLD 3 1 1 SHIELD 4. Line Ins These 1/4" jacks share circuitry (but not phantom power) with the mic preamps, and can be driven by balanced or unbalanced sources at almost any level. You can use these inputs for virtually any signal you'll come across since there is -20 to +30 dB of gain (50 dB range) available for line inputs via the gain knob. Always make sure to perform the level setting procedure on page 5. TRS stands for Tip-Ring-Sleeve, the three c onnections available on a stereo 1/4" cable. This allows for a direct connection to the channel input jacks. Be sure the cables are wired per AES (Audio Engineering Society) standards: 3 2 COLD HOT Balanced XLR Input Connector Professional ribbon, dynamic, and condenser mics all sound excellent through these inputs. The mic/line inputs will handle any kind of level you can toss at them, without overloading. Balanced 1/4" TRS Connector Sleeve - Shield (Ground) Tip - Positive (+ or hot) Ring - Negative (- or cold) RING SLEEVE SLEEVE RINGTIP TIP Not every instrument is made to connect directly to a mixer. Guitars commonly need a Direct Injection (DI) box to connect to the mixer's mic inputs. These boxes convert unbalanced line-level signals from your guitar RING TIP SLEEVE Balanced 1/4" TRS Connector Owner's Manual 9
-
 1
1 -
2
-
3
-
 4
4 -
 5
5 -
 6
6 -
 7
7 -
 8
8 -
 9
9 -
 10
10 -
 11
11 -
 12
12 -
 13
13 -
 14
14 -
15
-
16
-
17
-
18
-
19
-
20
-
21
-
22
-
23
-
24
 |
 |