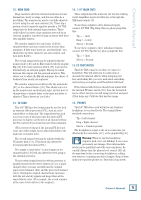
Mackie ProFX12 Owner's Manual - Page 12
Rear Panel Features - specifications
 |
View all Mackie ProFX12 manuals
Add to My Manuals
Save this manual to your list of manuals |
Page 12 highlights
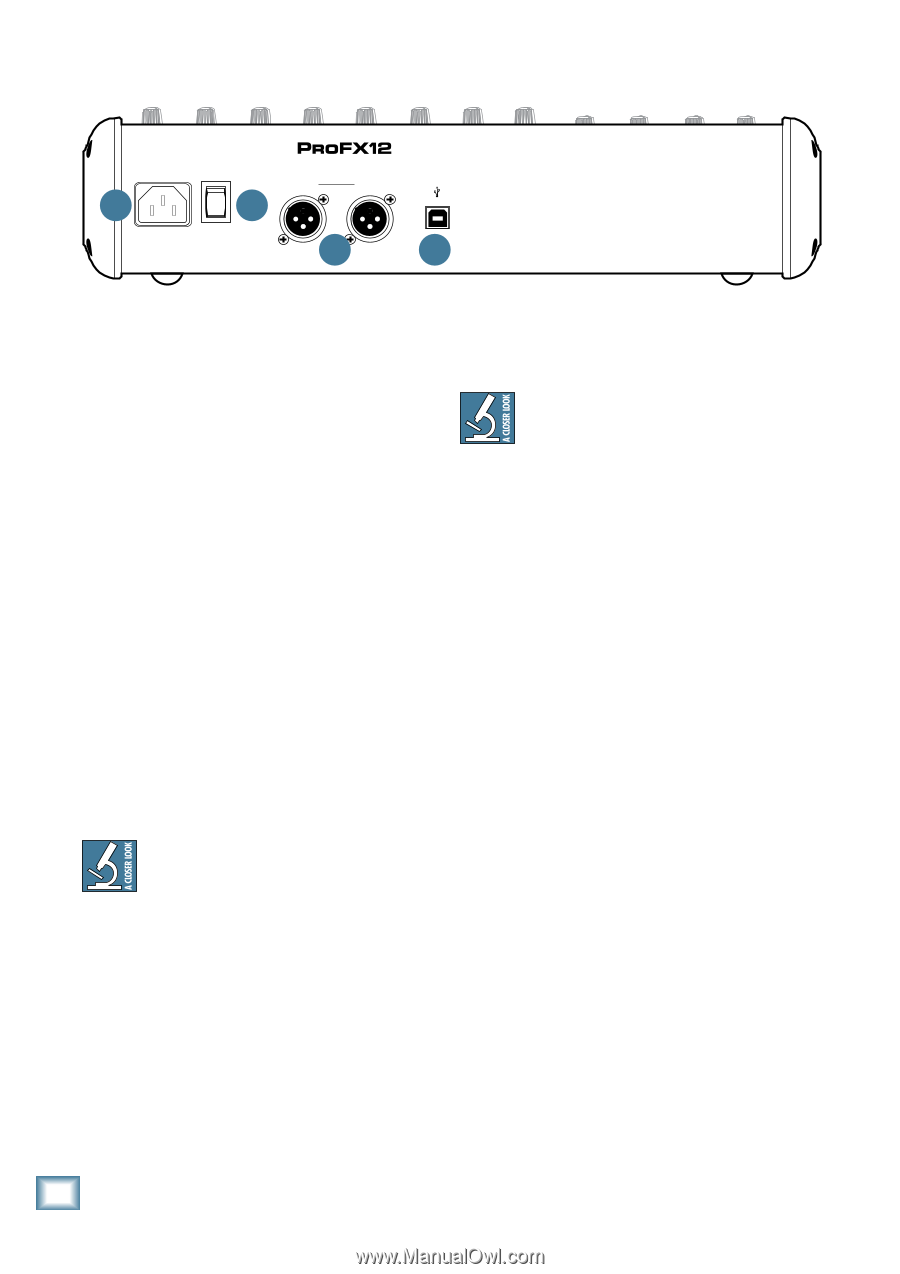
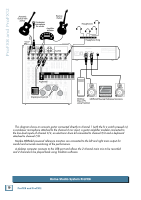
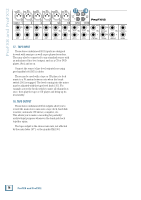
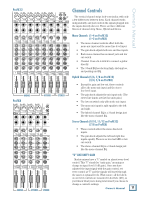
ProFX8 and ProFX12 Rear Panel Features POWER ON MAIN RIGHT (BALANCED) MAIN LEFT (BALANCED) 1 2 USB 3 4 MIC MIC MIC MIC MIC MIC (UNBALANCED) 1. POWER CONNECTION L TAPE IN This is a standard 3-prong IEC AC power connector. R L TAPE OUT ThR e XLR outputs are 6 dB higher output than Securely connect 1 LINE HI-Z the su2pplied d3etachab4le linec5o/6rd here7/8 9/10 t1h1e/112/4" TRS main outputs [14]. Balanced and plug the other end into an AC outlet. The mixer has BAL/ UNBAL BAL / UNBAL BAL / UNBAL BAL / UNBAL (MONO) L (MONO) L (MONO) L con(MnONOe) ctions(MONoO)ffer L L beBtALt/er UNBAL immunity L to external a universal power supply that may accept any AC voltage noise (specifically, hum and buzz) than unbalanced LINE/HI-ZIN1 LINE IN 2 LINE IN 3 LINE IN 4 LINE IN 5 BAL / UNBAL LINE IN 7 BAL / UNBAL LINE IN 9 BAL / UNBAL LINE IN 11 BAL / UNBAL BAL / UNBAL MON SEND BAL / UNBAL FOOTSWITCH ranging from 100 VAC to 240 VAC. No need for voltage R R connections. R Because R of R this, it is BAL/ UNBAL the preferred R select switches or step-up or step-down transformers; INSERT INSERT INSERT INSERT LINE IN 6 LINE IN 8 it will work virtually anywhere in the world. It is less susceptible to voltage sags or spikes than conventional U MIC GAIN LEVEL SET U MIC GAIN LEVEL SET U MIC GAIN LEVEL SET U MIC GAIN LEVEL SET MIC GAIN LEVEL SET MIC GAIN LEVEL SET power supplies and provides greater electromagnetic U -20dB +50 +30dB U -20dB +50 +30dB U -20dB +50 +30dB U -20dB +50 +30dB U +50 U +50 GAIN GAIN GAIN GAIN GAIN GAIN isolation and better protection against AC line noise. LOWCUT 100 Hz LOW CUT 100 Hz LOW CUT 100 Hz LOW CUT 100 Hz LOW CUT 100 Hz LOW CUT 100 Hz U EQ U EQ U EQ U EQ U EQ U EQ interconnect method, especially where very long LINE IN 10 LINE IN 12 ST RETURN FX SEND MAIN OUT PHONES lengths of cable are beSTiEnRgEOuGsReAPdH.IC EQ U U 15 4. USB PORT -20 +20 GAIN -20 +20 GAIN 10 5 0 15 48V 10 PHANTOM 5 POWER 0 UTheEQUSBU seErQia15l0 I/O interface allows di150gitaPlOWaERudio to HI HI 12kHz 12kHz 2. POWER SWITCH -15 +15 U -15 +15 U -15 +15 U HI 12kHz -15 +15 U HI 12kHz -15 +15 U HI 12kHz -15 +15 U HI 12kHz MID MID MID MID MID MID Press the top of this rocker switch to turn on the 2.5kHz -15 +15 2.5kHz -15 +15 2.5kHz -15 +15 2.5kHz -15 +15 2.5kHz -15 +15 2.5kHz -15 +15 U U U U U U mixer. The front panel power LED [32] will glow with LOW 80Hz LOW 80Hz LOW 80Hz LOW 80Hz LOW 80Hz LOW 80Hz happiness-15...+1o5 r at least -15 +15 it will if -15 +15 the mixer -15 +15 is -p15 l+u15 gged into -15 +15 U AUX U AUX U AUX U AUX U AUX U AUX a suitable liveMOAN C mainMOsN supplyM.ON MON MON MON OO OO OO OO OO OO OO OO OO OO OO OO +15 +15 +15 +15 +15 +15 U U U U U U Press the boFtXtom of tFhX is switcFXh to putFXthe mixeFXr into FX standby mo+d15eP.ANIt wil+1l5 nPAoNt fun+1c5 tPiAoNn, but+15 PtAhNe cir+1c5 uPAiNts are+15 PAN still live. To remove AC power, either turn off the AC trans12fHkHIez r to andHI 12kHz f1r5om a computer. 15 MAIN METERS -15 +15 -15 +15 125 250 500 1K 2K 4K 8K 0dB=0dBu U U OL TheMID interfaMcIDe provides MAIN MIX MON two audio EQ IN BYPASS outputs to15 10 the 2.5kHz 2.5kHz computer: -15 +15 U -15 +15 U 6 3 USB 0 LOW 80Hz LOW 80Hz FX PRESETS 2 • Main mix output, left and right. These output -15 +15 U AUX -15 +15 U AUX 01 BRIGHT ROOM 02 WARM LOUNGE 03 SMALL STAGE 04 WARM THEATER 05 WARM HALL 4 U 7 10 signals are independent of any adjustments MON MON 06 CONCERT HALL 07 PLATE REVERB 08 CATHEDRAL OO 20 +10 30 +15 U made to the main fader [47] and graphic EQ +15 U 09 CHORUS 10 CHORUS + REV 11 DOUBLER 12 TAPE SLAP INPUT LEVEL L R PRESETS OO OO OO OO FX +15 13 DELAY 1 (300ms) MUTE [36]. This allows you to easily record live FX +15 14 DELAY 2 (380ms) 15 DELAY 3 (480ms) 16 REVERB + DLY (250ms) USB THRU BREAK (MUTES ALL CHANNELS) PAN perfPoArNmancUe dOiLrectUly to a laptop. U mains suppL lRy, or unL pR lug theL pR ower cLoRrd fromL Rthe mixLeRr OO OO • The USB thru switch [40] allows you to also L R LR OO OO +15 +15 MAX +20 FX MASTER FX TO MON PHONES TAPE LEVEL and the ACOL mMUaTEins OsL upMUpTEly. OL MUTE MUTE OL MUTE OL MUTE OL MUTE OL incMluUTdE e theMoUTuE tput from yoMuOrNcompMuAtIeNr in your OL OL 1 2 3 4 5/6 dB 10 As a ged1n0B eral guid10Bde, turnd10Bon the md10B ixer firsd10Bt, 7/8 dB 10 9/10 rec1o1/r1d2ing.SST ReTeNpagFeX2RT3Nfor more details of this dB dB dB dB dB 10switch. 10 10 10 10 5 before a5 ny exter5 nal pow5er ampli5fiers or 5 5 5 5 5 5 5 U U U U U U 5 powere5d speake5 rs, and t5urn it of5f last. Th5is will redu1c0 e the p1o0 ssibility10of any t1u0 rn-on or10 turn-of1f0 U The cUomputer mU ay alsoUplaybackU two chaU nnels into 5 5 5 5 5 5 10the mixe10r via the10USB int1e0 rface: 10 10 thumps in20 the sp2e0 akers. 20 30 30 30 20 30 20 30 20 30 20 20 20 20 20 20 30 • 30Left and30right sig3n0 als from30 the com30 puter are 40 50 40 50 40 50 40 50 40 50 40 50 40 50 4500added to4500the main40 50 mix. The40 50 USB i45n00 put level OO 3. XLR M60 AIN OU60TS OO 60 OO OO 60 OO 60 OO 60 OO 60 OO 60 60 60 60 60 OO OO OO OO control [39] allows you to adjust the level of These XLR connectors provide stereo line-level signals from the main mix. Connect these to the the incoming audio from the computer being added to the main mix. balanced inputs of the powered speakers, or to the power amplifier powering the main speakers. The main mix is the sum of all active channels currently playing, including any 2-channel USB input from the computer. How much of a channel that is heard in the main mix is determined by that channel's fader [30]. 12 ProFX8 and ProFX12
-
 1
1 -
2
-
3
-
4
-
5
-
6
-
 7
7 -
 8
8 -
 9
9 -
 10
10 -
 11
11 -
 12
12 -
 13
13 -
 14
14 -
 15
15 -
 16
16 -
 17
17 -
18
-
19
-
20
-
21
-
22
-
23
-
24
-
25
-
26
-
27
-
28
-
29
-
30
-
31
-
32
-
33
 |
 |