Magellan Triton 200 Manual - English - Page 21
Resetting Maximum Speed, The Compass Screen, Customizing the Data Fields for the Compass Screen
 |
UPC - 763357117752
View all Magellan Triton 200 manuals
Add to My Manuals
Save this manual to your list of manuals |
Page 21 highlights
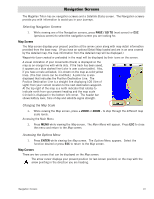
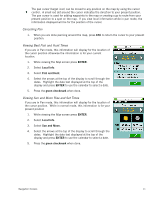
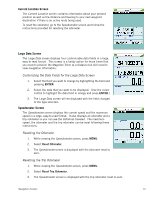
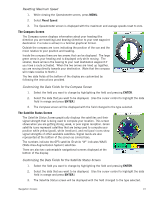
Resetting Maximum Speed 1. While viewing the Speedometer screen, press MENU. 2. Select Reset Speed. 3. The Speedometer screen is displayed with the maximum and average speeds reset to zero. The Compass Screen The Compass screen displays information about your heading (the direction you are travelling) and bearing (direction to your next waypoint destination if a route is active) in a familiar graphical format. Outside the compass are icons indicating the position of the sun and the moon relative to your position and heading. Inside the compass there are two arrows that can be displayed. The large green arrow is your heading and is displayed only while moving. The smaller, black arrow is the bearing to your next destination waypoint if you have a route activated. When the two arrows are lined up together, you are moving directly towards your destination. (Note that the compass will rotate relative to North.) The two data fields at the bottom of the display are customized by following the instructions provided. Customizing the Data Fields for the Compass Screen 1. Select the field you want to change by highlighting the field and pressing ENTER. 2. Select the data that you want to be displayed. (Use the cursor control to highlight the data field in orange and press ENTER.) 3. The Compass screen will be displayed with the field changed to the type selected. The Satellite Status Screen The Satellite Status Screen graphically displays the satellites and their signal strength that is being used to compute your location. This screen shows when you are getting strong, weak, or poor signal reception. Green satellite icons represent satellites that are being used to compute your position while yellow (good), white (medium), and red (poor) icons show signal strengths of other available satellites. Signal levels are also represented at the bottom of the screen as colored bars. The numbers indicate the GPS satellite ID while "W" indicates WAAS (Wide Area Augmentation System) satellites. There are also two customizable navigational screens displayed at the bottom of the display. Customizing the Data Fields for the Satellite Status Screen 1. Select the field you want to change by highlighting the field and pressing ENTER. 2. Select the data that you want to be displayed. (Use the cursor control to highlight the data field in orange and press ENTER.) 3. The Satellite Status screen will be displayed with the field changed to the type selected. Navigation Screens 13
-
 1
1 -
2
-
3
-
4
-
5
-
6
-
7
-
8
-
9
-
10
-
11
-
12
-
13
-
14
-
15
-
 16
16 -
 17
17 -
 18
18 -
 19
19 -
 20
20 -
 21
21 -
 22
22 -
 23
23 -
 24
24 -
 25
25 -
 26
26 -
27
-
28
-
29
-
30
-
31
-
32
-
33
-
34
-
35
-
36
-
37
-
38
-
39
-
40
-
41
-
42
-
43
-
44
-
45
-
46
-
47
-
48
-
49
-
50
-
51
-
52
-
53
-
54
-
55
-
56
 |
 |
