Magellan eXplorist 400 Manual - English - Page 12
Installing an Optional SD Card, Connecting to a Personal Computer, closing the SD Card Cradle. - usb cable
 |
UPC - 763357111613
View all Magellan eXplorist 400 manuals
Add to My Manuals
Save this manual to your list of manuals |
Page 12 highlights
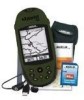
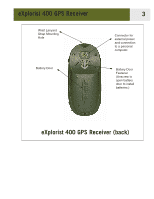
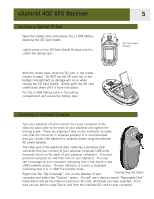
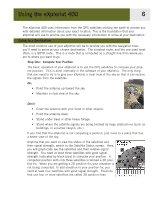
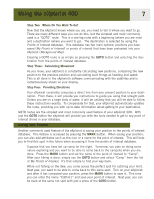
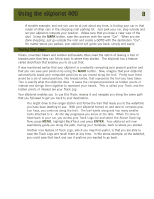
eXplorist 400 GPS Receiver Installing an Optional SD Card Open the battery door and remove the LI-ION battery, exposing the SD Card Cradle. Lightly press on the SD Card Cradle Release and the cradle will spring open. 5 SD Card Cradle Release With the cradle open, slide the SD card in the cradle (shown in gray). Do NOT lay the SD card flat in the battery compartment as damage will occur when closing the SD Card Cradle. Gently push the SD card cradle back down until it locks into place. Put the LI-ION battery back in the battery compartment and secure the battery door. Connecting to a Personal Computer Turn your eXplorist off and connect the round connector of the eXplorist data cable to the back of your eXplorist and tighten the locking screw. There are alignment tabs on the connector to make sure that the connector is installed properly. It is recommended that you connect the eXplorist to external power using the external AC power adapter. The other end of the eXplorist data cable has a standard USB connector that you connect to your personal computer USB ports (normally found on the back of your personal computer). Turn your personal computer on and then turn on your eXplorist. You may see a message on your computer indicating that it has found a new USB hardware device. On your eXplorist, a screen is displayed indicating that it is in USB File transfer mode. Right click the "My Computer" icon on the desktop of your Connecting the Cable computer and select the "Explore" option. You will see a device named "Removable Disk" listed which will be the internal memory or SD card, whichever you have selected. From here you are able to copy files to and from the installed SD card to your computer.
-
 1
1 -
2
-
3
-
4
-
5
-
6
-
 7
7 -
 8
8 -
 9
9 -
 10
10 -
 11
11 -
 12
12 -
 13
13 -
 14
14 -
 15
15 -
 16
16 -
 17
17 -
18
-
19
-
20
-
21
-
22
-
23
-
24
-
25
-
26
-
27
-
28
-
29
-
30
-
31
-
32
-
33
-
34
-
35
-
36
-
37
-
38
-
39
-
40
-
41
-
42
-
43
-
44
-
45
-
46
-
47
-
48
-
49
-
50
-
51
-
52
-
53
-
54
-
55
-
56
-
57
-
58
-
59
-
60
-
61
-
62
-
63
-
64
-
65
-
66
-
67
-
68
-
69
-
70
-
71
-
72
-
73
-
74
-
75
-
76
-
77
-
78
-
79
-
80
-
81
-
82
-
83
-
84
-
85
-
86
-
87
-
88
-
89
-
90
-
91
-
92
-
93
-
94
-
95
-
96
-
97
-
98
-
99
-
100
-
101
-
102
-
103
-
104
-
105
-
106
-
107
-
108
-
109
-
110
-
111
-
112
-
113
-
114
-
115
-
116
-
117
-
118
-
119
 |
 |
