Magnavox MRV700VR User manual, English (US) - Page 64
Digital Output
 |
View all Magnavox MRV700VR manuals
Add to My Manuals
Save this manual to your list of manuals |
Page 64 highlights
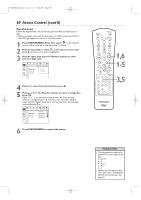
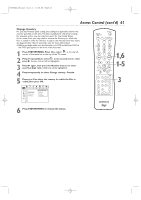
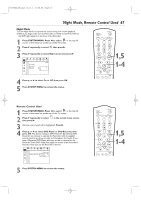
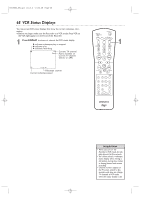
E9490UD_EN.qx3 04.8.3 11:55 AM Page 64 64 Digital Output After connecting the Recorder to your TV and other equipment, you may need to change the Recorder's Digital Output setting. Look to see which Recorder audio jacks you connected to your other equipment, then set Digital Output accordingly.The information in step 4 will help you decide. Adjust Digital Output only if you used the Recorder's COAXIAL DIGITAL AUDIO OUT jack. See page 16. (If you used the white/red AUDIO OUT L/R jacks, set Digital Output to Off. See page 65 to adjust the sound at Analog Output.) ● Before you begin, make sure the Recorder is in DVD mode. Press DVD so the DVD light appears on the front of the Recorder. 1 Press SYSTEM MENU. Press s to select in the top left corner of the menu bar at the top of the TV screen. 2 Press L repeatedly to select G, then press B. 3 Digital output will be selected. Press B. 4 Press K or L to select Off, PCM only, or All, then press OK. ● Select Off if you did not use the COAXIAL DIGITAL AUDIO OUT jack. ● Select PCM only if you used the Recorder's COAXIAL DIGITAL AUDIO OUT jack for connections, but your Stereo does not include a built-in digital multi-channel decoder. PCM represents Pulse Code Modulation. ● Select All if you connected the Recorder's COAXIAL DIGITAL AUDIO OUT jack to a Stereo that has a built-in multi-channel decoder. See page 16. W X YZ a ~ 1 2 1en off no off Sound Digital output s Off G Analog output PCM only K L r Night mode All 5 Press SYSTEM MENU to remove the menus. 1,5 1-4
-
 1
1 -
2
-
3
-
4
-
5
-
6
-
7
-
8
-
9
-
10
-
11
-
12
-
13
-
14
-
15
-
16
-
17
-
18
-
19
-
20
-
21
-
22
-
23
-
24
-
25
-
26
-
27
-
28
-
29
-
30
-
31
-
32
-
33
-
34
-
35
-
36
-
37
-
38
-
39
-
40
-
41
-
42
-
43
-
44
-
45
-
46
-
47
-
48
-
49
-
50
-
51
-
52
-
53
-
54
-
55
-
56
-
57
-
58
-
 59
59 -
 60
60 -
 61
61 -
 62
62 -
 63
63 -
 64
64 -
 65
65 -
 66
66 -
 67
67 -
 68
68 -
 69
69 -
70
-
71
-
72
-
73
-
74
-
75
-
76
-
77
-
78
-
79
-
80
-
81
-
82
-
83
-
84
-
85
-
86
-
87
-
88
-
89
-
90
 |
 |
