Makita LS1040 Owners Manual - Page 7
Installation - auxiliary plate
 |
View all Makita LS1040 manuals
Add to My Manuals
Save this manual to your list of manuals |
Page 7 highlights
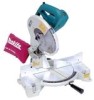
INSTALLATION 001855 Installing auxiliary plate 1 Installing the auxiliary plate using the notch in the tool's base 2 and secure it by tightening the hex bolt. 3 1. Auxiliary plate 2. Hex bolt 3. Base 1 2 001832 3 4 1. Auxiliary plate 2. Base 3. Hex bolt 4. Nut Bench mounting 001792 When the tool is shipped, the handle is locked in the lowered position by the stopper pin. Release the stopper pin by lowering the handle slightly and pulling the stopper pin. 1 1. Stopper pin 001856 This tool should be bolted with two bolts to a level and stable surface using the bolt holes provided in the tool's base. This will help prevent tipping and possible injury. 1 1. Bolt 7
-
 1
1 -
 2
2 -
 3
3 -
 4
4 -
 5
5 -
 6
6 -
 7
7 -
 8
8 -
 9
9 -
 10
10 -
 11
11 -
 12
12 -
13
-
14
-
15
-
16
-
17
-
18
-
19
-
20
-
21
-
22
-
23
-
24
-
25
-
26
-
27
-
28
-
29
-
30
-
31
-
32
 |
 |

7
INSTALLATION
Installing auxiliary plate
Installing the auxiliary plate using the notch in the tool’s base
and secure it by tightening the hex bolt.
Bench mounting
When the tool is shipped, the handle is locked in the lowered
position by the stopper pin. Release the stopper pin by lower-
ing the handle slightly and pulling the stopper pin.
This tool should be bolted with two bolts to a level and stable
surface using the bolt holes provided in the tool’s base. This
will help prevent tipping and possible injury.
1. Auxiliary plate
2. Hex bolt
3. Base
1. Auxiliary plate
2. Base
3. Hex bolt
4. Nut
1
2
3
001855
1
2
3
4
001832
1. Stopper pin
1
001792
1. Bolt
1
001856