Makita MAC5501G Instruction Manual - Page 11
Installation And, Break-in Procedures, Con't., Operating Procedures
 |
View all Makita MAC5501G manuals
Add to My Manuals
Save this manual to your list of manuals |
Page 11 highlights
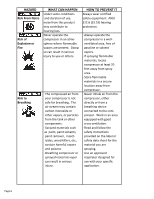
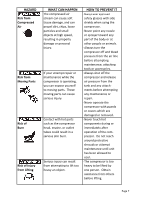
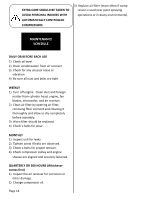
INSTALLATION AND BREAK-IN PROCEDURES (con't.) Initial Start Up Procedure: 1. Check engine & pump oil. 2. Open the air receiver's drain valve. 3. Run the compressor for a minimum of of twenty (20) minutes in the no-load condition to seat the piston ring. 4. Close air receiver drain valve. Your compressor is now ready for use. Piping Plastic or PVC pipe is not designed for use with compressed air. Regardless of its indicated pressure rating, plastic pipe can burst from air pressure. Use only metal pipe for air distribution lines. If a pipe line is necessary, use pipe that is the same size, or larger than, the air tank outlet. Piping that is too small will restrict the flow of air. If piping is over 100 feet long, use the next larger size. Bury underground lines below the frost line and avoid pockets where condensation can gather and freeze. Apply pressure before underground lines are covered to make sure all pipe joints are free of leaks. OPERATING PROCEDURES Installation Proper care, maintenance and lubrication ensures longevity. The compressor should always be level for proper lubrication. Use only in a clean, dry, well-ventilated area. The compressor has heat dissipation fins for proper cooling. Keep the fins and other parts that collect dust clean. Do not place rags or other materials on top of the compressor, as this obstructs cooling and can be a fire hazard. Daily Start-up Checklist 1. Before attaching air hose or accessories, make sure the pressure switch lever is set to "OFF" and the air regulator or shutoff valve is closed. 2. Attach hose and accessories. Too much air pressure causes a hazardous risk of bursting. Check the manufacturer's maximum pressure rating for air tools and accessories. The regulator outlet pressure must never exceed the maximum pressure rating. 3. Turn the pressure switch lever to "ON/ AUTO" and allow tank pressure to build. Motor will stop when tank pressure reaches "cut-out" pressure. 4. Open the regulator by turning it clockwise. Adjust the regulator to the correct pressure setting. Your compressor is now ready for use. 5. Always operate the air compressor in well-ventilated areas; free of gasoline or other solvent vapors. Do not operate the compressor near the spray area. When you are finished: 6. Set the pressure switch lever to "OFF". 7. Using the air tool or accessory, bleed the tank pressure down to zero. 8. Remove the air tool or accessory. 9. Drain water from the air tank by opening drain cock valve on bottom of tank. WATER WILL CONDENSE IN THE AIR TANK. IF NOT DRAINED, WATER WILL CORRODE AND WEAKEN THE AIR TANK CAUSING A RISK OF AIR TANK RUPTURE. Note: If drain cock valve is plugged, release all air pressure. The valve can then be removed, cleaned, then reinstalled. 10. After the water has been drained, close the drain valve. The air compressor can now be stored. Page 11
-
 1
1 -
2
-
3
-
4
-
5
-
 6
6 -
 7
7 -
 8
8 -
 9
9 -
 10
10 -
 11
11 -
 12
12 -
 13
13 -
 14
14 -
 15
15 -
 16
16 -
17
-
18
-
19
-
20
 |
 |