Makita MAC5501G Instruction Manual - Page 13
Operating Your Air Compressor, Operating Procedures
 |
View all Makita MAC5501G manuals
Add to My Manuals
Save this manual to your list of manuals |
Page 13 highlights
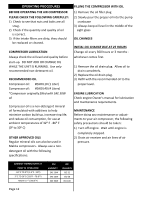
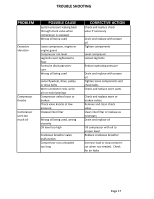
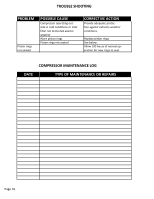
OPERATING PROCEDURES CHECKING BELT TENSION Adjust belt(s) so when pressure is applied at the center, there is approximately 1/2" slack (see diagram "Figure A" below). If the belt is installed too tight, the engine might be overloaded. This will cause the engine to overheat. If the belt is installed too loosely, it will slip and excessive wear and vibration will occur. HOW TO INSTALL A NEW BELT IF REQUIRED: 1) Turn off engine. Wait until engine is completely stopped. 2) Remove belt guard. 3) Loosen engine bolts and slide engine toward compressor head just enough to allow the old belt to be removed. 4) Install proper replacement belt. 5) Slide engine away from compressor head to provide recommended tension as shown in diagram above (Figure A). 6) Align belt using a straight edge ruler against pulley's edge. 7) Fasten engine bolts. 8) Ensure engine and compressor pulley's are secure. Re-check alignment. 9) Re-install belt guard. 10) Belt tension should be checked after 20 hours of operation. Check tension monthly thereafter. OPERATING YOUR AIR COMPRESSOR ENGINE - GAS DRIVEN 1) Check the entire unit for any damage. 2) Check compressor and engine oil level, fill or add if necessary. 3) Make sure gas tank is filled. 4) Read entire engine manual. 5) Starting the engine: a) Move fuel lever to the "ON" position. - If engine is cold, move choke lever to the "CLOSED" position. - If engine is warm, leave choke lever in "OPEN" position. b) Turn engine switch to "ON" position. c) Pull starter grip lightly until you feel resistance, then pull briskly, returning starter grip gently engine should start. If not, repeat. d) Once the engine starts running, slowly move the choke lever to the "OPEN" position. e) With the engine running properly, the compressor fills the air receiver with compressed air, when maximum pressure (set by the pilot valve control) is reached, the engine and compressor will slow down to idle speed, and will return to full RPM when the cut-in pressure is reached. The unit will continue to cycle automatically until turned off. 6) Stopping the engine: a) Turn the engine switch to the "OFF" position. b) Turn the fuel lever to the "OFF" position. ENGINE IDLE SPEED MAY NEED TO BE ADJUSTED, EVEN ON YOUR BRAND NEW UNIT TO COMPENSATE FOR DIFFERENCES IN ALTITUDE. PLEASE CONSULT THE ENGINE OPERATING MANUAL. Page 13
-
 1
1 -
2
-
3
-
4
-
5
-
6
-
7
-
 8
8 -
 9
9 -
 10
10 -
 11
11 -
 12
12 -
 13
13 -
 14
14 -
 15
15 -
 16
16 -
 17
17 -
 18
18 -
19
-
20
 |
 |
