Marantz M-CR603 M-CR603 User Manual - English - Page 9
Connections - wireless
 |
View all Marantz M-CR603 manuals
Add to My Manuals
Save this manual to your list of manuals |
Page 9 highlights
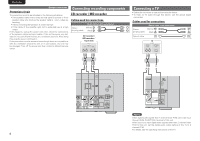
Getting Started Connections Basic Operations Advanced Operations Information Explanation terms Troubleshooting Specifications Index Connections This section explains how to connect speakers, recording equipment, antennas and network. For other connections, see the sections below. n The wireless receiver connection (vpage 27) NOTE • Do not plug in the power cord until all connections have been completed. • When making connections, also refer to the user guide of the other components. • Be sure to connect the left and right channels properly (left with left, right with right). • Do not bundle power supply cords together with connection cables. Doing so can result in humming or noise. Speaker connections Audio cable (sold separately) Pin-plug cable (Black) Speaker cable ENGLISH Connecting the speaker cables Carefully check the left (L) and right (R) channels and + (red) and - (black) polarities on the speakers being connected to the unit, and be sure to connect the channels and polarities correctly. 1 Peel off about 10 mm of sheathing from the tip of the speaker cable, then either twist the core wire tightly or apply solder to it. 2 Turn the speaker terminal counterclockwise to loosen it. 3 Insert the speaker cable's core wire to all the way into the speaker terminal. qw R wq L Input terminals Subwoofer with built-in amp 4 Turn the speaker terminal clockwise to tighten it. NOTE • Use speakers with an impedance of 6 to 8 Ω. The protection circuit may be activated if speakers with an impedance other than specified are used. • Connect the speaker cables so they do not stick out of the speaker terminals. The protection circuit may be activated if the wires touch the rear panel or if the + and - sides touch each other (vpage 6 "Protection circuit"). • Never touch the speaker terminals while the power supply is connected. Doing so could result in electric shock. Set the speaker output for the unit to match the speaker connections made to terminals A and B (vpage 33 "Setting speaker output"). The default setting is SPEAKER A. NOTE Be sure to lower the audio volume before making speaker settings. 5
-
 1
1 -
2
-
3
-
 4
4 -
 5
5 -
 6
6 -
 7
7 -
 8
8 -
 9
9 -
 10
10 -
 11
11 -
 12
12 -
 13
13 -
 14
14 -
15
-
16
-
17
-
18
-
19
-
20
-
21
-
22
-
23
-
24
-
25
-
26
-
27
-
28
-
29
-
30
-
31
-
32
-
33
-
34
-
35
-
36
-
37
-
38
-
39
-
40
-
41
-
42
-
43
-
44
-
45
-
46
-
47
-
48
-
49
-
50
-
51
-
52
 |
 |
