Marantz SR5004 SR6004 / SR5004 User Manual - English - Page 28
Ch Input Setup, Function Rename
 |
View all Marantz SR5004 manuals
Add to My Manuals
Save this manual to your list of manuals |
Page 28 highlights
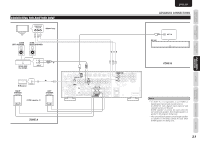
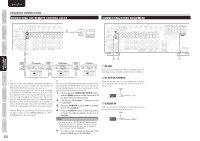
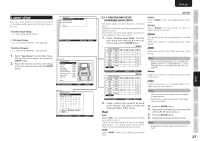
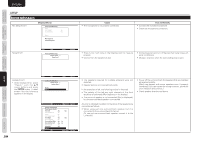
ENGLISH NAMES AND FUNCTIONS CONNECTIONS BASIC OPERATION ADVANCED CONNECTIONS SETUP 1-2 7.1CH INPUT SETUP This menu is for adjusting the speaker levels for 7.1channel input sources. Here you will adjust the volume for each channel so that they are all heard by the listener at the same level. BASIC 1. Select "7.1ch Input Setup" from the Input Setup menu with the 3 or 4 cursor buttons and press the ENTER button. 7.1ch Input Setup Video-in Front Left Center Front Right Surround Right Surround Back Right Surround Back Left Surround Left Subwoofer : Last : 0.0dB : 0.0dB : 0.0dB : 0.0dB : 0.0dB : 0.0dB : 0.0dB : 0.0dB Return : Up / Down : Change Enter : Exit : Exit 2. Select "Video-in" with the 3 or 4 cursor buttons. 3. Using the 1 or 2 cursor buttons, select the video input source to be played through the MONITOR OUT jack. The input source is switched by pressing the 1 or 2 cursor buttons as follows; Last ↔ BLU-RAY ↔ DVD ↔ VCR ↔ DSS ↔ TV ↔ CD/CDR ↔ AUX ↔ M-XPort ↔ Video-off ↔Last ↔... Notes • When "Last" is selected, the source is set to the source selected before the 7.1 ch input menu was activated. • When "Video-off" is selected, no signal is emitted from MONITOR OUT jack. 4. Select desired channel with the 3 or 4 cursor buttons. 5. Using the 1 or 2 cursor buttons, adjust the volume level of each channel. Move the cursor to "Return" with the 3, 4, 1, and 2 cursor buttons, and press the ENTER button to go to the Input Setup menu. 26 Note • The volume level can be set between -12 dB and +12 dB in 0.5 dB increments on all channels except the subwoofer (SUB W), which can be set from -18dB to +12 dB in 0.5 dB increments. 1-3 FUNCTION RENAME Input sources can be registered under any name. This menu is for renaming input source. This menu is for renaming function name. Names can be up to 10 characters long, including spaces. (Characters are selected from those appearing on the display.) This name appears on the unit's FL display and the GUI, but it does not appear in the GUI Setup menu. 1. Select "Function Rename" from the Input Setup menu with the 3 or 4 cursor buttons and press the ENTER button. Function Rename Function : BLU-RAY Rename :B L U - R A Y ABCDE F GH I JK LM N O P Q R S T U VWX Y Z abcde f gh i j k Im n o p q r s t u vwx y z 0123456789! "# Space Backspace Default Return : Up / Down : Change Enter : Exit : Exit 2. Select "Function" with the 3 or 4 cursor buttons. 3. Select an input source with the 1 or 2 cursor buttons. 4. Select "Rename" with the 3 or 4 cursor buttons. 5. Move the cursor to the character (1st to 10th) to change with the 1 or 2 cursor buttons. 6. Move the cursor to the character list with the 4 cursor button. (Move the cursor to the letter "A" to begin with.) 7. Select a character with the 3, 4, 1, and 2 cursor buttons. 8. Press the ENTER button to enter the selected letter. 9. Repeat steps 5-8 until the new name is input. Space: Inserts a space at the cursor point of the "Rename" area. Backspace: Deletes the character left of the cursor in the "Rename" area one character at a time. Default: Restores the name in the "Rename" area to the name in the "Function" area. Note • Rename cannot be left blank. Move the cursor to "Return" with the 3, 4, 1, and 2 cursor buttons and press the ENTER button to go to the Input Setup menu. SETUP ADVANCED OPERATION TROUBLESHOOTING OTHERS
-
 1
1 -
2
-
3
-
4
-
5
-
6
-
7
-
8
-
9
-
10
-
11
-
12
-
13
-
14
-
15
-
16
-
17
-
18
-
19
-
20
-
21
-
22
-
 23
23 -
 24
24 -
 25
25 -
 26
26 -
 27
27 -
 28
28 -
 29
29 -
 30
30 -
 31
31 -
 32
32 -
 33
33 -
34
-
35
-
36
-
37
-
38
-
39
-
40
-
41
-
42
-
43
-
44
-
45
-
46
-
47
-
48
-
49
-
50
-
51
-
52
-
53
-
54
-
55
-
56
-
57
-
58
-
59
-
60
-
61
-
62
-
63
-
64
-
65
-
66
-
67
-
68
-
69
-
70
-
71
-
72
-
73
-
74
-
75
-
76
-
77
-
78
-
79
-
80
-
81
-
82
-
83
-
84
-
85
-
86
-
87
-
88
-
89
-
90
-
91
-
92
-
93
-
94
-
95
-
96
 |
 |
