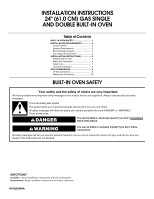
Maytag CWG3100AAE Installation Instructions - Page 6
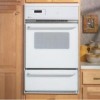
Installation Instructions - oven
 |
UPC - 719881043210
View all Maytag CWG3100AAE manuals
Add to My Manuals
Save this manual to your list of manuals |
Page 6 highlights
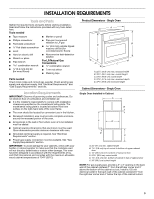
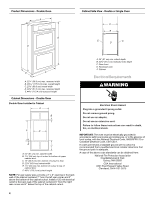
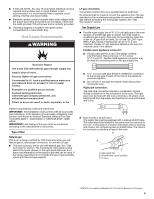
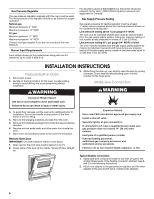
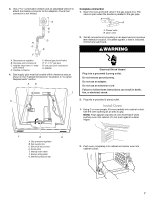
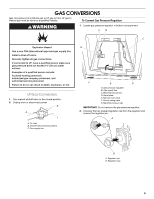
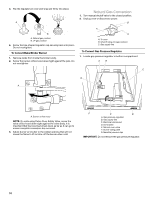
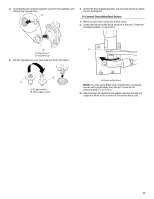
Gas Pressure Regulator The gas pressure regulator supplied with this oven must be used. The inlet pressure to the regulator should be as follows for proper operation: Natural gas: Minimum pressure: 5" WCP Maximum pressure: 14" WCP LP gas: Minimum pressure: 11" WCP Maximum pressure: 14" WCP Contact local gas supplier if you are not sure about the inlet pressure. Burner Input Requirements Input ratings shown on the model/serial rating plate are for elevations up to 2,000 ft (609.6 m). For elevations above 2,000 ft (609.6 m), the burner should be reduced 4% for each 1,000 ft (304.8 m) above sea level (not applicable for Canada). Gas Supply Pressure Testing Gas supply pressure for testing regulator must be at least 1" water column pressure above the manifold pressure shown on the model/serial rating plate. Line pressure testing above ½ psi gauge (14" WCP) The oven and its individual shutoff valve must be disconnected from the gas supply piping system during any pressure testing of that system at test pressures in excess of ½ psi (3.5 kPa). Line pressure testing at ½ psi gauge (14" WCP) or lower The oven must be isolated from the gas supply piping system by closing its individual manual shutoff valve during any pressure testing of the gas supply piping system at test pressures equal to or less than ½ psi (3.5 kPa). INSTALLATION INSTRUCTIONS Prepare Built-In Oven 1. Disconnect power. 2. Decide on the final location for the oven. Locate existing wiring to avoid drilling into or severing wiring during installation. WARNING 3. While lifting the door up, very slightly open the door by pulling it forward. Check that the latches swing down into the notches on the hinge arms. Make Gas Connection WARNING Excessive Weight Hazard Use two or more people to move and install oven. Failure to do so can result in back or other injury. 3. To avoid floor damage, set the oven onto cardboard prior to installation. Do not use handle or any portion of the front frame or trim for lifting. 4. Remove the shipping materials and tape from the oven. 5. Remove the hardware package from inside the bag containing literature. 6. Remove and set aside racks and other parts from inside the oven. 7. Move oven and cardboard close to the oven's final location. Remove Oven Door IMPORTANT: Use both hands to remove oven doors. 1. Open door to the broil stop position (about 4" to 6"). 2. Grasp sides of the door at the middle. Slowly lift door straight up. Explosion Hazard Use a new CSA International approved gas supply line. Install a shut-off valve. Securely tighten all gas connections. If connected to LP, have a qualified person make sure gas pressure does not exceed 14" (36 cm) water column. Examples of a qualified person include: licensed heating personnel, authorized gas company personnel, and authorized service personnel. Failure to do so can result in death, explosion, or fire. Typical flexible connection 1. Apply pipe-joint compound made for use with LP gas to the smaller thread ends of the flexible connector adapters (see B and G in the following illustration). 2. Attach one adapter to the gas pressure regulator and the other adapter to the gas shutoff valve. Tighten both adapters. 6
-
 1
1 -
 2
2 -
 3
3 -
 4
4 -
 5
5 -
 6
6 -
 7
7 -
 8
8 -
 9
9 -
 10
10 -
 11
11 -
 12
12
 |
 |
