Meade StarNavigator 90mm Instruction Manual - Page 4
Easy Set-up Guide
 |
View all Meade StarNavigator 90mm manuals
Add to My Manuals
Save this manual to your list of manuals |
Page 4 highlights
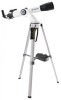
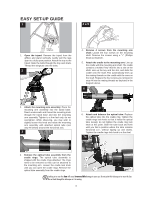
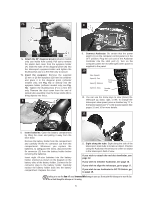
EASY SET-UP GUIDE 1 4 & 5 Fasten wingnuts 1. Open the tripod: Remove the tripod from the giftbox and stand vertically. Gently pull the legs apart to a fully open position. Attach the tray to the tripod: Slide the bolts through the tray and struts. Thread the wingnuts onto the bolts. 2 4. Remove 4 screws from the mounting arm shaft: Locate the four screws on the mounting shaft. Remove the screws using a "+" (Phillips head) screwdriver. 5. Attach the cradle to the mounting arm: Line up the cradle with the mounting arm shaft. The cradle contains a molded "key" that fits into a slot on the shaft. Line up the key and the slot, and slide the cradle onto the shaft. This automatically lines up the mating threads on the cradle with the ones on the shaft. Replace the four screws you removed in step #4 into the mating threads as depicted in the diagram above. 6 2. Attach the mounting arm assembly: Place the mounting arm assembly into the tripod base. Reach underneath and thread the mounting knob through the tripod base and into the mounting arm assembly. Tighten to a firm feel only, do not overtighten. While observing, you may wish to slightly loosen this knob and rotate the mounting arm assembly with attached optical tube (see step #6 below) around the horizontal axis. 3 6. Attach and balance the optical tube: Replace the optical tube into the cradle ring. Tighten the cradle rings lock knob so that it holds the optical tube loosely; do not tighten the cradle ring lock knob at this point. Slide the tube back and forth until you find a position where the tube remains horizontal (i.e., without tipping up and down). Tighten the cradle rings lock knob to a firm feel. 7a D A 3. Remove the optical tube assembly from the cradle rings: The optical tube assembly is shipped with the cradle rings attached. The rings F need to be removed so they can be attached to the mounting arm. Loosen the cradle lock knob B until you can open the cradle rings. Remove the C optical tube assembly from the cradle rings. E Looking at or near the Sun will cause irreversible damage to your eye. Do not point this telescope at or near the Sun. Do not look through the telescope as it is moving. 4
-
 1
1 -
 2
2 -
 3
3 -
 4
4 -
 5
5 -
 6
6 -
 7
7 -
 8
8 -
 9
9 -
 10
10 -
11
-
12
-
13
-
14
-
15
-
16
-
17
-
18
-
19
-
20
-
21
-
22
-
23
-
24
-
25
-
26
-
27
-
28
-
29
-
30
-
31
-
32
-
33
-
34
-
35
-
36
-
37
-
38
-
39
-
40
-
41
-
42
-
43
-
44
-
45
-
46
-
47
-
48
 |
 |
