Memorex NMP4101-SBS User Guide - Page 14
Transferring Audio Files To Your Digital Audio Player, Using A Macintosh Computer
 |
UPC - 749720011346
View all Memorex NMP4101-SBS manuals
Add to My Manuals
Save this manual to your list of manuals |
Page 14 highlights
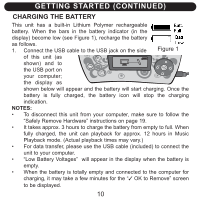
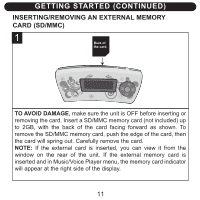
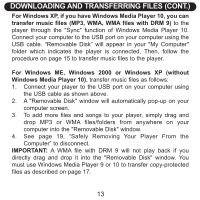
DOWNLOADING AND TRANSFERRING FILES (CONT.) TRANSFERRING AUDIO FILES TO YOUR DIGITAL AUDIO PLAYER USING A MACINTOSH COMPUTER Make sure to use a Macintosh computer with an operating system of 10.2.8 to transfer audio files. 1. Turn on your computer. 2. Connect the smaller end of the cable to the USB jack on the player and the larger end of the cable to the USB port on your Macintosh. 3. Your computer will automatically recognize your player and mount a hard disk icon onto your desktop. 4. Locate the folder where your audio files are stored on your computer's hard drive. Simply drag and drop the audio files onto the mounted hard disk drive icon of your digital audio player located on your desktop. 5. After you have finished your transfer, put away the digital audio player hard disk icon(s) by dragging it to the Trash icon or Controlclick its icon and choose Eject from the File menu or select Eject from the File drop-down menu located at the top of your screen. You can also use the keyboard shortcuts by selecting the digital audio player hard disk icon and pressing the Command-E keys. 6. Your player is ready to play the files you transferred. NOTE: This unit supports MP3 and WMA file formats. If you are using iTunes, you must convert your files to MP3 format before transferring to this unit. 14
-
 1
1 -
2
-
3
-
4
-
5
-
6
-
7
-
8
-
 9
9 -
 10
10 -
 11
11 -
 12
12 -
 13
13 -
 14
14 -
 15
15 -
 16
16 -
 17
17 -
 18
18 -
 19
19 -
20
-
21
-
22
-
23
-
24
-
25
-
26
-
27
-
28
-
29
-
30
-
31
-
32
-
33
-
34
-
35
-
36
-
37
-
38
-
39
-
40
-
41
-
42
-
43
-
44
-
45
 |
 |