Miele DA 6690 D Product Manual - Page 43
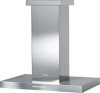
With recirculation mode: upwards as, it will go, downwards only to the
 |
View all Miele DA 6690 D manuals
Add to My Manuals
Save this manual to your list of manuals |
Page 43 highlights
Installation Connect the power cord. See "Elec‐ trical connection." Place the exhaust ducting onto the exhaust socket. Unscrew both screws from the instal‐ lation frame again. The canopy can now be adjusted to the desired height, observing the permissi‐ ble height ranges: - With vented mode: upwards as far as it will go, downwards only to the "A" marking. - With recirculation mode: upwards as far as the "U", downwards as far as it will go. Follow the instructions in "Appliance dimensions." Safety distances be‐ tween the cooktop and ventilation hood must be observed. 43
-
 1
1 -
2
-
3
-
4
-
5
-
6
-
7
-
8
-
9
-
10
-
11
-
12
-
13
-
14
-
15
-
16
-
17
-
18
-
19
-
20
-
21
-
22
-
23
-
24
-
25
-
26
-
27
-
28
-
29
-
30
-
31
-
32
-
33
-
34
-
35
-
36
-
37
-
 38
38 -
 39
39 -
 40
40 -
 41
41 -
 42
42 -
 43
43 -
 44
44 -
 45
45 -
 46
46 -
 47
47 -
 48
48 -
49
-
50
-
51
-
52
-
53
-
54
-
55
-
56
 |
 |

Installation
43
Connect the power cord. See "Elec‐
trical connection."
Place the exhaust ducting onto the
exhaust socket.
Unscrew both screws from the instal‐
lation frame again.
The canopy can now be adjusted to the
desired height, observing the permissi‐
ble height ranges:
–
With vented mode: upwards as far as
it will go, downwards only to the "A"
marking.
–
With recirculation mode: upwards as
far as the "U", downwards as far as it
will go.
Follow the instructions in "Appliance
dimensions." Safety distances be‐
tween the cooktop and ventilation
hood must be observed.