Motorola SD7561 User Guide - Page 21
Connecting the Base Unit, Charging the Handset Battery - phone battery
 |
UPC - 612572132203
View all Motorola SD7561 manuals
Add to My Manuals
Save this manual to your list of manuals |
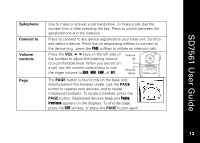
Page 21 highlights
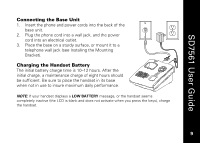
SD7561 User Guide Connecting the Base Unit 1. Insert the phone and power cords into the back of the base unit. 2. Plug the phone cord into a wall jack, and the power cord into an electrical outlet. 3. Place the base on a sturdy surface, or mount it to a telephone wall jack (see Installing the Mounting Bracket). Charging the Handset Battery The initial battery charge time is 10-12 hours. After the initial charge, a maintenance charge of eight hours should be sufficient. Be sure to place the handset in its base when not in use to insure maximum daily performance. NOTE: If your handset displays a LOW BATTERY message, or the handset seems completely inactive (the LCD is blank and does not activate when you press the keys), charge the handset. 9
-
 1
1 -
2
-
3
-
4
-
5
-
6
-
7
-
8
-
9
-
10
-
11
-
12
-
13
-
14
-
15
-
 16
16 -
 17
17 -
 18
18 -
 19
19 -
 20
20 -
 21
21 -
 22
22 -
 23
23 -
 24
24 -
 25
25 -
 26
26 -
27
-
28
-
29
-
30
-
31
-
32
-
33
-
34
-
35
-
36
-
37
-
38
-
39
-
40
-
41
-
42
-
43
-
44
-
45
-
46
-
47
-
48
-
49
-
50
-
51
-
52
-
53
-
54
-
55
-
56
-
57
-
58
-
59
-
60
 |
 |
