Motorola SD7561 User Guide - Page 22
Installing the Mounting Bracket
 |
UPC - 612572132203
View all Motorola SD7561 manuals
Add to My Manuals
Save this manual to your list of manuals |
Page 22 highlights
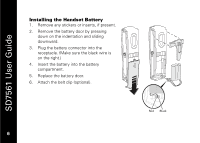
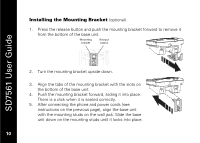
SD7561 User Guide Installing the Mounting Bracket (optional) 1. Press the release button and push the mounting bracket forward to remove it from the bottom of the base unit. 2. Turn the mounting bracket upside down. 3. Align the tabs of the mounting bracket with the slots on the bottom of the base unit. 4. Push the mounting bracket forward, sliding it into place. There is a click when it is seated correctly. 5. After connecting the phone and power cords (see instructions on the previous page), align the base unit with the mounting studs on the wall jack. Slide the base unit down on the mounting studs until it locks into place. 10 10
-
 1
1 -
2
-
3
-
4
-
5
-
6
-
7
-
8
-
9
-
10
-
11
-
12
-
13
-
14
-
15
-
16
-
 17
17 -
 18
18 -
 19
19 -
 20
20 -
 21
21 -
 22
22 -
 23
23 -
 24
24 -
 25
25 -
 26
26 -
 27
27 -
28
-
29
-
30
-
31
-
32
-
33
-
34
-
35
-
36
-
37
-
38
-
39
-
40
-
41
-
42
-
43
-
44
-
45
-
46
-
47
-
48
-
49
-
50
-
51
-
52
-
53
-
54
-
55
-
56
-
57
-
58
-
59
-
60
 |
 |

SD7561 User Guide
10
Installing the Mounting Bracket
(optional)
1.
Press the release button and push the mounting bracket forward to remove it
from the bottom of the base unit.
2.
Turn the mounting bracket upside down.
3.
Align the tabs of the mounting bracket with the slots on
the bottom of the base unit.
4.
Push the mounting bracket forward, sliding it into place.
There is a click when it is seated correctly.
5.
After connecting the phone and power cords (see
instructions on the previous page), align the base unit
with the mounting studs on the wall jack. Slide the base
unit down on the mounting studs until it locks into place.