NEC NC900C-A User Manual - Page 10
Names of the Projector Parts, 1-3-1. Front of the Projector - filters
 |
View all NEC NC900C-A manuals
Add to My Manuals
Save this manual to your list of manuals |
Page 10 highlights
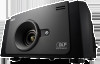
1. What's in the Box? and the Names of the Projector Parts 1-3. Names of the Projector Parts 1-3-1. Front of the Projector 1 8 2 3 4 5 6 7 1. STATUS indicator These indicate the status of the projector. When the projector is operating normally, these light/blink in green or orange. When an error occurs, they light/blink in red. When an error occurs, check the contents of the display on the LCD screen. (See page 68) 2. LAN port The connector for external devices such as a cinema server or a PC installed with the DCC. (See page 13) 3. Connection terminals Various image signal cable are to be connected here. (See page 13) You can expand signal input terminals by installing the optional signal input board (NC-80LB01-B/NC-80DS01-B). Contact your dealer/distributor for more information on separately sold optional products. 4. Control panel On the control panel, power to your projector is turned on or off, titles are selected, and various adjustments are made of projected screen. (See page 14) 5. Air inlet / Air filter The air inlet for cooling inside the projector. Do not cover. An air filter is attached over the air inlet to prevent dust. Refer to "5-3. Replacing the Lamp and the Air Filter" (page 52) on how to replace the air filter. 6. Lens (optional) Images are projected from the lens. Request your dealer/distributor to install or replace the lens. 7. Interlock connector (inside front of projector) This is the connector for the projector safety device. This is used to control the projector from an external source. Consult with your dealer/distributor about using this. 8. Notch filter cover Remove the cover when replacing the notch filter. Contact your dealer/distributor for details on replacement notch filters. 10
-
 1
1 -
2
-
3
-
4
-
 5
5 -
 6
6 -
 7
7 -
 8
8 -
 9
9 -
 10
10 -
 11
11 -
 12
12 -
 13
13 -
 14
14 -
 15
15 -
16
-
17
-
18
-
19
-
20
-
21
-
22
-
23
-
24
-
25
-
26
-
27
-
28
-
29
-
30
-
31
-
32
-
33
-
34
-
35
-
36
-
37
-
38
-
39
-
40
-
41
-
42
-
43
-
44
-
45
-
46
-
47
-
48
-
49
-
50
-
51
-
52
-
53
-
54
-
55
-
56
-
57
-
58
-
59
-
60
-
61
-
62
-
63
-
64
-
65
-
66
-
67
-
68
-
69
-
70
-
71
-
72
-
73
-
74
-
75
-
76
-
77
-
78
-
79
-
80
-
81
-
82
-
83
-
84
-
85
-
86
-
87
-
88
 |
 |
