Netgear C7000 Genie Apps User Manual - Page 26
Use a QR Code to Connect to a WiFi Network, Enable Guest Access, Apply, QR Code
 |
View all Netgear C7000 manuals
Add to My Manuals
Save this manual to your list of manuals |
Page 26 highlights
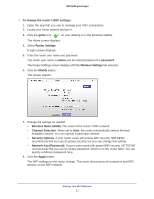
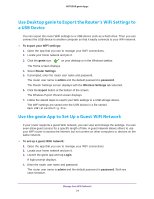
NETGEAR genie Apps 6. Select the Enable Guest Access radio button. The Guest Access screen displays the default guest network settings. 7. Change the settings as needed to customize your guest network. 8. Click the Apply button. 9. When prompted to confirm the change, click the OK button. The router guest network settings are updated and the new guest network settings display. The screen displays a QR code that can be used to connect to the guest network. Use a QR Code to Connect to a WiFi Network One NETGEAR genie app can generate a QR code for your router's WiFi network and guest access. Other phones and tablets can then use their own genie app's QR code scanner to scan and connect to the WiFi network. For you to use a QR code, your phone or tablet must include a camera and you must install the genie app on it. Note: You can use the Kindle Fire to generate a QR code, but because it does not include a camera, the Kindle Fire cannot scan QR codes. To use a QR code to connect to the WiFi network: 1. Launch the genie app. If you do not see the QR code button, swipe to display more buttons. 2. Tap the QR Code button . 3. When prompted, align the QR code within the frame. 4. Tap Scan. Your phone or tablet scans the QR code for the network. If you are using an Android device, it connects to the WiFi network automatically. For other WiFi devices, the password is copied into the clipboard. 5. If you are prompted to enter a password to connect to the network, paste the password from the clipboard. Manage Your WiFi Network 26
-
 1
1 -
2
-
3
-
4
-
5
-
6
-
7
-
8
-
9
-
10
-
11
-
12
-
13
-
14
-
15
-
16
-
17
-
18
-
19
-
20
-
 21
21 -
 22
22 -
 23
23 -
 24
24 -
 25
25 -
 26
26 -
 27
27 -
 28
28 -
 29
29 -
 30
30 -
 31
31 -
32
-
33
-
34
-
35
-
36
-
37
-
38
-
39
-
40
-
41
-
42
-
43
-
44
-
45
-
46
-
47
-
48
-
49
-
50
-
51
-
52
-
53
-
54
-
55
-
56
-
57
 |
 |